
How to Automate Your Garden Watering Without an Expensive Irrigation System

Automate garden watering with a hose timer and drip tubing — a beginner-friendly setup for raised beds, containers, fruit trees, and greenhouses.
The short answer
Yes, you can automate garden watering without trenches, an installer, or an in-ground sprinkler system.
For most home gardens, the simplest reliable setup is an outdoor faucet, a programmable hose timer, a filter and pressure regulator, and drip tubing that delivers water slowly to the soil at each plant. No buried pipes. No control panel wired into your house.
[Image: Faucet, timer, filter, regulator, and drip tubing in a raised bed]
Why drip plus a timer works
Hand watering is flexible, but it is easy to get wrong. Some plants get soaked, some get missed, and much of the water lands on leaves and paths where roots never use it. Overhead sprinklers suit lawns better than vegetable beds: they wet foliage, which can encourage disease, and wind can carry spray away from plants.
Drip irrigation puts water slowly and directly into the soil, near the roots. Extension sources describe drip as the most efficient irrigation method for most home gardens, exceeding 90 percent efficiency, while sprinkler systems and hand watering are 50 to 70 percent efficient. Colorado State University Extension gives the same comparison, with an important warning: any system, including drip, can waste water if it is set to water too much.
Iowa State University Extension adds that drip can use 30 to 50 percent less water than sprinklers and keeps foliage dry, which helps with disease management. The timer turns that potential into real savings.
The tool that does the scheduling
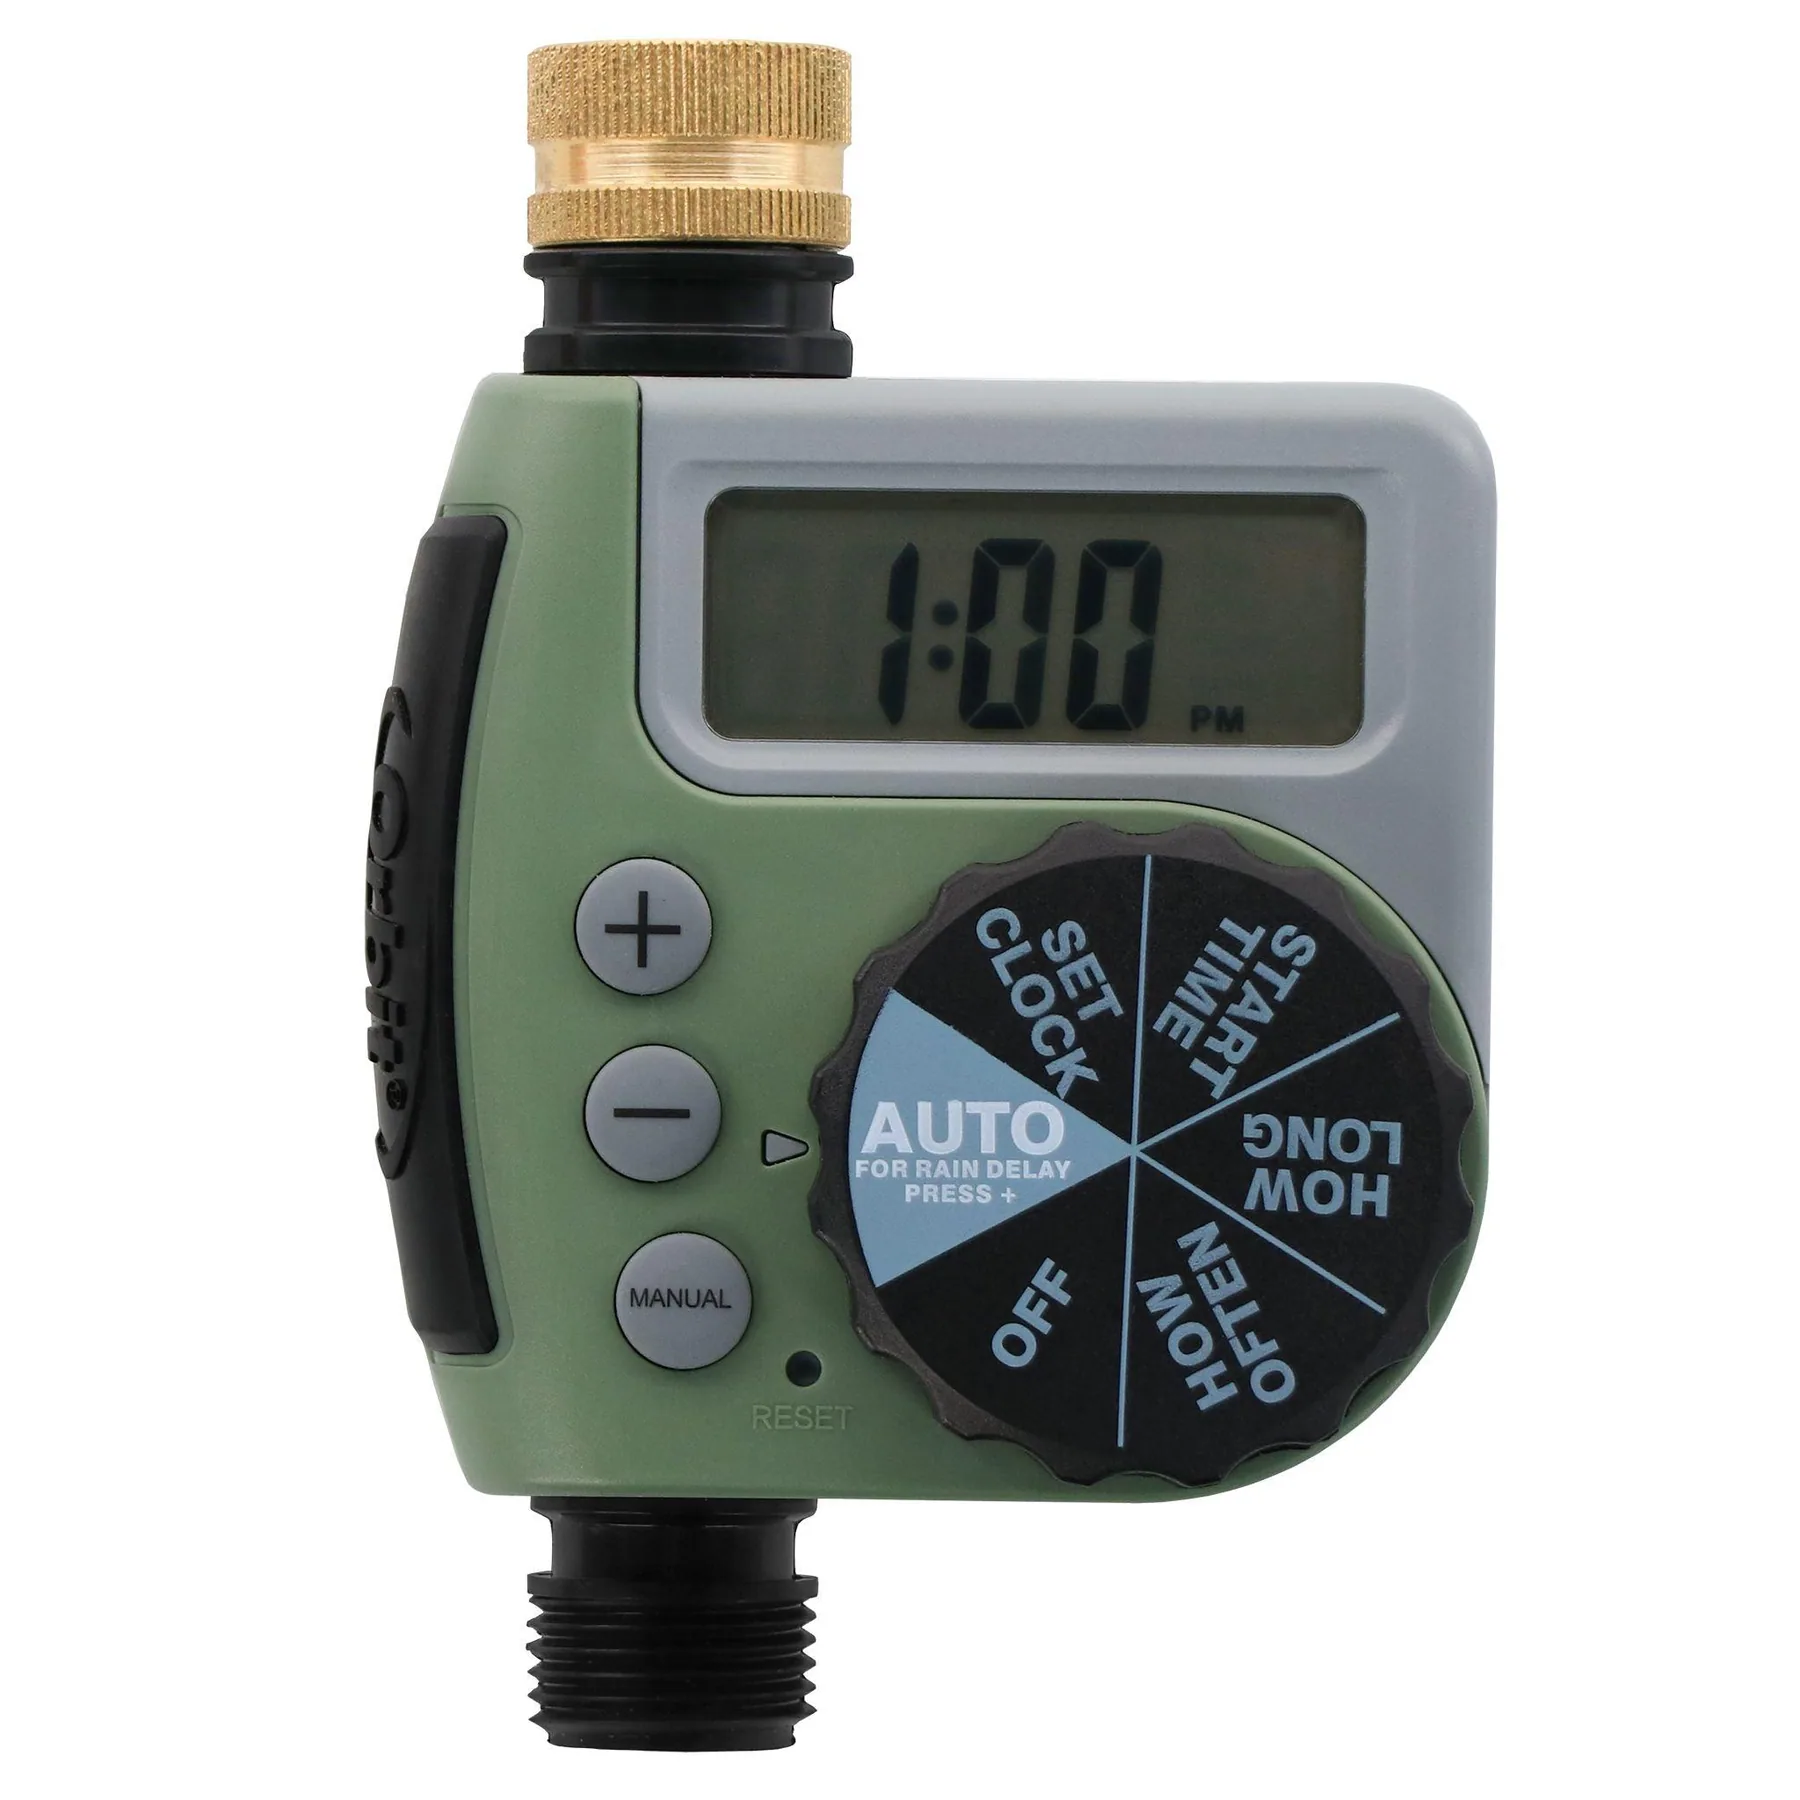
The centerpiece here is the Orbit Digital Hose Watering Timer (ASIN B004INGS8S).
It screws onto an outdoor faucet and turns water on and off on a schedule you set. Product information found for this model says it runs on two AA batteries, offers watering durations from 1 to 240 minutes, and frequencies from every 6 hours to once every 7 days. It also has manual watering, so you can water outside the schedule without erasing your program, and a rain-delay feature that can pause watering for 1 to 3 days after rain.
That range matters in a mixed garden: containers, mulched beds, and new fruit trees all need different schedules, and this timer can run the one you set for each zone.
One limit: this is a single-outlet timer, not a multi-zone controller. Use a hose splitter or different run times for very different plant groups.
Compare your options first
MethodBest forWatch out forHand wateringA few pots or plants that need a daily lookEasy to overwater or underwater; slow in summerOverhead sprinklerLawns and large open areasWets leaves, loses water to wind, waters paths and weedsSoaker hoseA straight row or one raised bedCan be uneven along a long run; check the far endDrip tubing plus a hose timerRaised beds, rows, containers, fruit trees, greenhousesEmitters can clog without a filter; check the system, since you cannot always see it workingPot-in-pot with a drip emitterPatios, greenhouse benches, containers that dry fastStanding water in the outer pot can rot roots[Image: Hand watering, sprinkler, soaker hose, and drip emitters compared]
Step 1: Map the garden before you buy tubing
Group plants by water need, not by appearance. This is the step most beginners skip, and it causes most scheduling trouble later.
A workable grouping:
- Thirsty and shallow-rooted: lettuce, new seedlings, most containers in summer.
- Steady and deep-rooted: tomatoes, peppers, squash, and established vegetables in mulched beds.
- Slow and deep: fruit trees and large shrubs, especially in their first two years.
- Light and careful: herbs that prefer to dry a little between waterings, and plants in a cool greenhouse in winter.
Step 2: Build in the right order
From the faucet outward, a basic drip setup runs like this:
- Outdoor faucet. Fix any drip first. A timer cannot save water from a leaking faucet.
- Hose timer. Attach the Orbit Digital Hose Watering Timer and set it to manual or off while you build, so you do not get sprayed halfway through.
- Filter. Clemson Cooperative Extension is blunt: filters and pressure regulators are a must for drip emitters, microsprayers, and drip tape, and those systems will not work properly without them. The filter catches sediment before it reaches tiny emitter openings.
- Pressure regulator. Household pressure is usually too high for drip tubing; match the regulator to your kit's instructions.
- Mainline tubing. Run it as straight and short as practical; Colorado State Extension lists overly long runs and too many emitters as common mistakes.
- Distribution tubing and emitters. Place emitters at each plant's base, not on leaves.
- End caps. Cap the ends, but leave a way to flush the line. Flushing pushes sediment out before it settles in emitters.
[Image: Faucet, timer, filter, and regulator in order]
Flush the open lines first, then cap the ends and check for leaks.
Step 3: Program a starting schedule, then adjust
No single schedule fits every garden. Soil, sun, wind, mulch, container size, and plant size all change the answer. Use a starting point, check the soil, and adjust.
A sensible Connecticut summer starting point:
- Mulched raised beds: deep watering two to three times a week, long enough to wet the root zone, rather than a short daily splash.
- Outdoor containers in heat: check daily, and expect daily watering in hot, dry weather. Extension guidance notes that container plants dry fast and often need daily watering, with enough water to reach the bottom and drain out.
- Newly planted fruit trees: water deeply and check moisture at about six inches deep. University of Maryland Extension advises checking daily for the first two weeks after planting, then at least weekly during the first two years.
- Greenhouse beds and benches: check more often than you think. A greenhouse can be warm and dry even on a cool day, and bench pots dry faster than beds in the ground.
For vegetables, North Carolina State Extension benchmarks at least one inch of water per week in the growing season, up to two inches in sandy soil or a heat wave, split into two or three applications.
After watering, check the soil. Push a finger or trowel into the bed. For vegetables, you want moisture in the top six to eight inches, not just a wet surface. For containers, you want water to reach the bottom without leaving the pot sitting in a puddle.
Program the timer in small steps. Set the time correctly first, choose a shorter duration than you think you need, run the system, and check how deep the water went. Watch for a full week. Check soil before the next watering, not right after. If soil is still wet at root depth, lengthen the gap. If it is dry, lengthen the duration or shorten the gap. Use the rain delay after real rain: a good rain is a watering, and skipping a cycle then is one of the easiest ways to save water.
Water in the morning when you can, to lose less to evaporation.
Raised beds: the easiest win
Raised beds suit drip automation well. The bed has clear edges, plants are close together, and tubing can run straight down the row.
Mulch over the tubing, but leave emitters accessible enough to check. Mulch slows evaporation and steadies soil moisture, which makes the timer schedule more forgiving.
Check the far end weekly: plants there show stress first if pressure drops or an emitter clogs.
[Image: Raised bed with drip tubing under mulch]
Containers: small soil, fast drying
Containers are easy to overwater and underwater: small soil volume heats and dries fast, but can also stay soggy.
Give each pot its own emitter and run short, frequent cycles in summer; one long watering can flood a small pot.
Check drainage with every new pot. Extension guidance warns both ways: drying out completely can cause flower and fruit drop, while waterlogging starves roots of oxygen. Check the soil, not just the leaves.
Fruit trees: slow, deep, and wide
Fruit trees need water over a wider area as they grow. A single emitter at the trunk will not do the job for long. Place emitters in a ring around the tree, starting a little away from the trunk and expanding outward as the canopy grows. Water slowly, so it soaks in rather than running off, especially on a slope or in clay soil.
Water new trees immediately and thoroughly after planting, and check soil as Maryland Extension advises in the first two years. Established trees still need deep water during fruit development and dry spells.
Mulch helps, but keep it a few inches away from the trunk so bark stays dry. Do not pile mulch against the trunk. That traps moisture against bark and invites rot.
In Connecticut, check soil moisture during fruit set even after a wet spring; fruit size suffers quietly when water is short.
Greenhouses: warm, enclosed, and easy to overwater
A greenhouse changes watering in two directions at once. It protects plants from wind and heavy rain, but it traps heat, and bench plants can dry quickly on a sunny day. In winter, the opposite problem appears: cool, damp air and slow growth mean plants use less water, and wet soil stays wet longer.
Keep greenhouse watering on its own schedule. Water in the morning, ventilate when weather allows, and check bench pots daily in summer.
A monitor can help you learn your greenhouse, but it does not water plants. The TempPro TP50 temperature/humidity monitor (ASIN B01H1R0K68, already in the catalog) displays readings locally and sends no remote alerts, so use it as a walk-through check, not a watering controller.
Pot-in-pot growing: two pots, one job
Pot-in-pot growing, as used here, means a planted inner pot sitting inside a larger outer pot. Gardeners use it to swap plants in and out, insulate roots, or keep a patio tidy. It is not a substitute for drainage, and it is not automatically self-watering.
The common mistake is simple: water collects in the outer pot, the inner pot sits in it, and roots stay wet. That can rot roots even if the plant looked well watered from above.
If you automate a pot-in-pot setup, follow these rules:
- The inner pot must have drainage holes, and excess water must be able to escape or be emptied from the outer pot.
- Place the drip emitter in the inner pot, at soil level, not in the gap between pots.
- Leave a gap or riser between the pots, so the inner pot does not sit in a puddle.
- Check the outer pot after the first few waterings. If water pools, shorten the duration or add drainage.
- Lift the inner pot occasionally. If it still feels heavy and soggy days after watering, the schedule is too long or too frequent.
[Image: Inner pot inside an outer pot, emitter at soil level]
Troubleshooting
- Some plants dry while others stay wet: check for a clogged emitter, kinked line, or a run too long for the pressure available. Check the far end first.
- Water pools on the surface: shorten the duration, or split one long watering into two shorter ones. Soil can only absorb water so fast.
- Emitters keep clogging: clean or replace the filter and flush the lines. Clemson lists skipping a filter or pressure reducer as a common mistake; Iowa State notes that small emitter openings clog without proper care.
- The timer waters at the wrong time or not at all: check batteries, start time, and whether rain delay is still on after a rainy spell. Check that the faucet is fully open.
- Leaves look wet or diseased with drip: check that emitters sit at soil level and are not spraying upward, and look for a leak misting foliage.
- Plants wilt even though the timer ran: check soil depth, not just the surface. A short watering can wet the top inch while roots stay dry. Lengthen the duration if soil is dry at root depth.
- The system fails in fall: in Connecticut, drain outdoor lines before a hard freeze, disconnect the timer if manufacturer instructions call for it, and store sensitive parts indoors. A cracked fitting in spring is often a frozen line from fall.
[Image: Checking a drip emitter and filter]
Recommended tools and shopping list
- Featured: Orbit Digital Hose Watering Timer (ASIN B004INGS8S). The scheduling center of this setup: two AA batteries, 1-to-240-minute durations, frequencies from every 6 hours to once every 7 days, plus manual watering and a 1-to-3-day rain delay, per product information found for this model.
- Drip irrigation starter kit. One box with tubing, fittings, and emitters suits a first build.
- Drip irrigation pressure regulator. Brings household pressure down for drip tubing.
- Drip irrigation filter. Catches sediment before it clogs emitters.
- Drip irrigation mainline and distribution tubing. Mainline runs along the bed; smaller tubing reaches each plant.
- Drip emitters. Place one or more at each plant. Keep spares.
- Soil-moisture meter. A probe checks soil at root depth; use it with the finger test.
- Hose splitter. Lets two areas run from one faucet.
- Optional greenhouse companion: TempPro TP50 temperature/humidity monitor (ASIN B01H1R0K68, already in the catalog). Displays readings locally; it sends no remote alerts and does not control watering.
Frequently asked questions
Can I automate watering without an in-ground system?
Yes. A hose timer plus drip tubing is the most common beginner route. It uses an existing faucet, needs no trenching, and can be moved or expanded as the garden changes.
Do I really need a filter and pressure regulator?
For drip, yes. Clemson Extension states that filters and pressure regulators are a must for drip emitters, microsprayers, and drip tape, and that those systems will not work properly without them.
How often should I water a raised bed?
Start with deep waterings two to three times a week in summer, and adjust by checking soil at root depth. Mulched beds hold moisture longer than bare beds; containers dry faster than raised beds.
How often should I water containers?
Check daily in summer and expect daily watering in hot, dry weather. Extension guidance notes that container plants dry fast and often need daily watering, with enough water to reach the bottom and drain out.
Will drip irrigation save water?
It can, if the schedule is right. Extension sources report drip exceeding 90 percent efficiency, versus 50 to 70 percent for sprinklers and hand watering. But Colorado State Extension warns that any system can waste water if set to water excessively.
A simple rule to keep
Automate the schedule, not the observation. Let the timer turn water on and off. Let drip tubing put water at the roots. Then walk the garden, check the soil, look at the plants, and adjust. That weekly check separates a system that saves time from one that quietly underwatered a bed for a month.
Affiliate disclosure
Some links in this article are affiliate links, including the Orbit Digital Hose Watering Timer link and the TempPro TP50 link. If you buy through those links, Junecity Studio may earn a commission at no additional cost to you. That commission helps support the garden, the greenhouse, and future guides. Product names and specifications are shared for identification and setup help, not as a guarantee of results in your garden. Always follow manufacturer instructions for the products you buy.
Keep growing with Junecity Studio
Explore more practical greenhouse and garden guides at junecity.studio. Two greenhouse videos worth watching next are How I Heat My Greenhouse Without Electricity in Connecticut and Greenhouse Build on a Budget. They cover the shelter side of year-round growing, while this guide covers the watering side.
Further reading / Sources
These sources were checked via web search for this draft.
- Colorado State University Extension, Drip Irrigation for Home Gardens: https://extension.colostate.edu/resource/drip-irrigation-for-home-gardens/
- Clemson Cooperative Extension, Installing Drip Irrigation in Home Gardens: https://hgic.clemson.edu/factsheet/installing-drip-irrigation-in-home-gardens/
- Clemson Cooperative Extension, Landscape Irrigation Equipment Part 5: Filters & Pressure Regulators: https://hgic.clemson.edu/factsheet/landscape-irrigation-equipment-part-5-filters-pressure-regulators/
- Iowa State University Extension, Using Drip Irrigation in the Garden: https://yardandgarden.extension.iastate.edu/how-to/using-drip-irrigation-garden
- University of Maryland Extension, Watering Trees and Shrubs: https://extension.umd.edu/resource/watering-trees-and-shrubs
- North Carolina State Extension, Pender County Center, How to Water Vegetables and Herbs: https://pender.ces.ncsu.edu/news/how-to-water-vegetables-and-herbs/
Keep exploring
Find more Junecity guides
Browse practical gardening, outdoor living, and DIY articles.Browse the blogShop this guide
Affiliate Picks
Tools & supplies I use and recommend


As an affiliate, junecity.studio may earn from qualifying purchases at no additional cost to you.
Keep growing
Suggested reading

Growing Citrus in Connecticut in NOVEMBER?! 🍊❄️🤯
Discover how to successfully grow citrus indoors in Connecticut during the chilly month of November. This guide offers practical tips for protecting your potted plants from the cold while they thrive indoors.

Tomorrow Decides Who Wins the Lemon Tree 🍋
Explore the strategy behind winning a lemon tree in a competitive treasure hunt. Learn tips for caring for your own lemon plants and optimizing their growth.
0 comments
Comments (0)
We love hearing from our community. Share your thoughts, questions, or experience.
Have something to add?
Log in to post, react, share images, and join threads.
Newest First
All Comments
Showing 0-0 of 0
Start the conversation.
Questions and first-hand experience are welcome here.