
I Paid $60 for ONE Tree… Now I Have 10-Foot Trees for FREE 🌲😳

Learn how a single Green Giant arborvitae can be transformed into multiple thriving trees through propagation. This guide covers the steps, tips, and key takeaways for successful tree propagation.
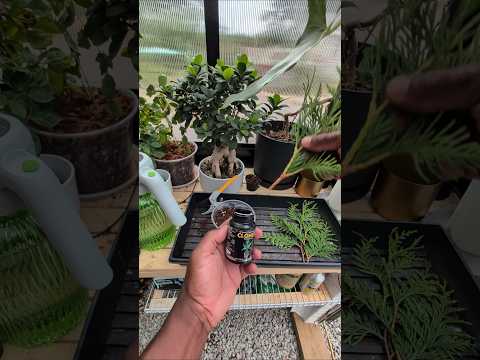

At a glance
Key Takeaways

Be Patient
Rooting can take time, so don’t rush the process.

Monitor Conditions
Ensure your cuttings have adequate humidity and warmth for optimal growth.

Choose the Right Time
Late spring or early summer is typically the best time for taking cuttings.

Check for Pests
Keep an eye out for pests that may harm your cuttings.
In 2023, I purchased a Green Giant arborvitae for about $60. Little did I know, this investment would grow into an abundance of trees, some reaching nearly 10 feet tall! In this article, I’ll walk you through the process of propagating trees from cuttings, sharing valuable insights and tips to help you cultivate your own thriving garden.
Why Propagate Trees?
Tree propagation allows gardeners to multiply their plants without the cost of purchasing new ones. It’s a rewarding process that not only expands your garden but also fosters a deeper connection to your plants. Here are some reasons to consider:
- Cost-effective: Save money by propagating from existing plants instead of buying new ones. This can be particularly beneficial for those who want to create a lush garden without breaking the bank.
- Variety: Create a diverse garden with multiple varieties of the same species or different species. This diversity can enhance the aesthetic appeal of your garden and attract a variety of wildlife.
- Connection: Engage with the gardening process from start to finish, witnessing the growth of new plants. This connection can be incredibly fulfilling and can lead to a greater appreciation for nature.
- Environmental Benefits: By propagating trees, you contribute to the environment by increasing greenery and improving air quality. Trees provide habitat for wildlife and play a crucial role in maintaining ecological balance.
Getting Started with Propagation
Before you start propagating your Green Giant arborvitae, gather the necessary materials:
- Sharp Pruning Shears: Essential for taking clean cuttings without damaging the plant.
- Rooting Hormone: A product like Clonex Rooting Gel can significantly enhance root development and increase your success rate.
- Containers: Use pots with drainage holes filled with a suitable potting mix to prevent waterlogging and ensure good drainage.
- Water: Ensure you have a reliable water source to keep your cuttings hydrated, as maintaining moisture is crucial for their survival.
- Plastic Bags or Domes: To maintain humidity around the cuttings, using plastic bags or humidity domes can create a greenhouse effect that encourages rooting.
Steps to Propagate Your Green Giant Arborvitae
- Choose a Healthy Parent Plant: Look for a vibrant Green Giant arborvitae free from pests and diseases. A healthy parent plant will produce stronger offspring.
- Take Cuttings: Use sharp pruning shears to snip off 6-8 inch cuttings from the tips of healthy branches. Make sure to cut just below a leaf node, as this is where roots are most likely to form.
- Apply Rooting Hormone: Dip the cut end of each cutting into rooting hormone to encourage root growth. This step is crucial, as rooting hormones contain auxins that stimulate root development.
- Plant the Cuttings: Insert the cuttings into the prepared pots filled with potting mix, ensuring they are securely placed. Make a hole with your finger or a pencil to avoid damaging the hormone coating.
- Water and Cover: Water the cuttings thoroughly until the soil is moist but not soggy. Then, cover them with a plastic bag or dome to retain humidity and create a warm environment.
- Provide Proper Care: Place the pots in a warm, bright location, but out of direct sunlight to prevent scorching. Monitor moisture levels and keep the soil damp but not soggy. Check the cuttings regularly for signs of growth.
- Transplanting: Once the cuttings have developed roots (usually within 4-8 weeks), they can be transplanted into larger pots or directly into the ground. Ensure that the new planting site has well-draining soil and adequate sunlight.
Key Takeaways for Successful Tree Propagation
- Be Patient: Rooting can take time, so don’t rush the process. Each cutting may root at a different rate, and it’s essential to let them develop fully before transplanting.
- Monitor Conditions: Ensure your cuttings have adequate humidity and warmth for optimal growth. If you notice the soil drying out too quickly, adjust your humidity measures.
- Choose the Right Time: Late spring or early summer is typically the best time for taking cuttings, as the plant is actively growing and can heal faster.
- Check for Pests: Keep an eye out for pests that may harm your cuttings, such as aphids or spider mites. Treat any infestations promptly to protect your new plants.
Common Mistakes to Avoid
While propagating trees is straightforward, there are a few pitfalls to watch out for:
- Overwatering: Too much water can lead to root rot. Ensure proper drainage and check soil moisture regularly. Allow the top inch of soil to dry out before watering again.
- Insufficient Light: Cuttings need bright, indirect light to thrive. Avoid direct sunlight which can scorch them. If you notice the cuttings stretching toward the light, they may need more brightness.
- Ignoring Pests: Keep an eye out for pests that can harm your cuttings. Treat any infestations promptly with insecticidal soap or neem oil.
- Improper Timing: Taking cuttings during the wrong season can hinder rooting success. Stick to the recommended times for your specific tree type.
Next Steps After Rooting
Once your cuttings have rooted and are ready for transplanting, consider the following:
- Location: Choose a suitable spot for your trees, considering factors like sunlight, soil type, and space. Ensure the area has enough room for the trees to grow to their full size.
- Ongoing Care: Water regularly, especially during dry spells, and consider fertilizing to encourage vigorous growth. A balanced fertilizer can provide the nutrients needed for healthy development.
- Pruning: Prune your trees as they grow to maintain shape and health. Regular pruning helps promote a fuller, bushier growth habit.
- Watch for Diseases: Stay vigilant for signs of disease, such as yellowing leaves or unusual growth patterns. Promptly address any issues to maintain plant health.
Conclusion
Tree propagation can transform your gardening experience, allowing you to cultivate multiple plants from a single tree. With the right techniques and a bit of patience, you'll be on your way to enjoying a lush landscape filled with thriving Green Giant arborvitae. Happy gardening!
Photos from this idea
Helpful products for this project
These products were matched to the materials, tools, and care steps discussed in the article.
- Bare Essentials Living - White Kaolin Clay Powder (2 lb) 100% Natural White Powdered Clay for Seed Bombs, White Clay Mask, DIY Spa, Soap, Bath Bomb, Deodorant, Can be Used as Kaolin Clay for Gardening - View Product: 100% NATURAL WHITE KAOLIN CLAY: This pure and chemical-free kaolin clay powder is...
- Clonex Rooting Gel - High-Performance Rooting Compound for Plant Cuttings, Contains IBA, Promotes Root Initiation & Development - 100ml - View Product: HIGH-PERFORMANCE ROOTING GEL - Clonex Rooting Gel is a water-based formula with...
- BOENFU 6 Inches Wire Cutters Heavy Duty Snips Flush Cut Side Cutters Pliers Metal Cutting Tool for Crafting, Floral, Artificial Flowers, Chicken Wire, Electrical, 1 Pack - View Product: Flush-cut Wire Cutter: Extra-long cutting edge can easily snips electrical wire up...
- Neem Bliss (16 Fl Oz) - Pure Neem Oil Concentrate - 100% Cold Pressed Neem Oil - All-Natural Neem Oil Concentrate - Pure Neem Oil Extract - Unrefined Neem Oil for Hair - Neem Seed Oil Concentrate - View Product: 100% Pure Neem Oil Extract - Plantonix Neem Bliss is pure, unrefined neem oil...
Source: Watch the original YouTube Short.
Keep growing
Suggested reading

Get a Free Meyer Lemon Plant Shipped Right to Your Door
Discover how to receive a free Meyer lemon plant and learn essential tips for growing your own citrus tree at home.
Can I Grow an Avocado Tree in the Ground in Connecticut?
Discover the ins and outs of growing an avocado tree in Connecticut, including suitable conditions, care tips, and potential challenges.
0 comments
Comments (0)
We love hearing from our community. Share your thoughts, questions, or experience.
Have something to add?
Log in to post, react, share images, and join threads.
Newest First
All Comments
Showing 0-0 of 0
Start the conversation.
Questions and first-hand experience are welcome here.