
Do Seedling Heat Mats Really Work? The Science Behind Faster Germination

Do seedling heat mats really work? Learn how bottom heat speeds germination for tomatoes and peppers, plus thermostat settings and troubleshooting.
The short answer: yes, for the right seeds
Yes — for warm-season seeds in a cool room, a seedling heat mat really does help. It does not make weak seed strong, and it does not replace light, water, or good seed-starting mix. It warms the soil under your seed tray so seeds germinate more evenly and, in cool conditions, sooner than they would in cold mix.
Many failures blamed on bad seeds are really temperature problems: soil in a tray on a cold windowsill, basement shelf, or unheated greenhouse bench can be much colder than your house feels — and cold soil is where tomato and pepper seeds stall.
One clear limit up front: a seedling heat mat heats seed trays, not a whole greenhouse. It warms the root zone directly under a tray. It will not heat greenhouse air, keep a greenhouse frost-free, or replace a greenhouse heater. Think of it as a warm pad for one tray, not a furnace for a building.
[Image: Seed tray on a heat mat on a shelf, with a thermometer probe in the soil and a humidity dome nearby]
Why soil temperature matters more than air temperature
Seeds respond to the temperature of the damp mix around them, not to your wall thermostat.
Cornell Cooperative Extension advises keeping temperature about 10°F above the optimum growing temperature from planting until seeds sprout, then dialing heat back once they are up. Heating mats, Cornell notes, warm containers, soil, and seeds from the bottom.
The University of New Hampshire Extension makes a similar point: for many seeds, soil temperature matters more than air temperature. Most homes are not kept at the 75°F to 80°F range many seeds prefer for germination, so a tray can be too cool even in a comfortable room.
Cold soil means dormant seeds, uneven germination, and rot risk in wet mix. Warm soil does not guarantee germination, but when temperature is the bottleneck, bottom heat removes it.
What the numbers actually say
You do not need a chart for every vegetable. You need to know whether your seed is warm-season or cool-season.
University of Wisconsin Extension recommends soil at 80°F to 90°F with a heating mat or cable during germination for tomatoes, peppers, and eggplants, then about 70°F after germination. It gives a planning window, too: tomatoes 4 to 6 weeks before transplanting, peppers 6 to 8 weeks.
University of California Cooperative Extension gives a wider tomato optimum, 65°F to 85°F, and shows why the middle matters. In that range, tomatoes take roughly 6 to 8 days to emerge. At 50°F, emergence stretches past 40 days. At 104°F, germination fails. Tomatoes tolerate cool soil, but they make you wait for it.
UConn Extension adds Connecticut context: warm-season vegetables need soil at least 60°F to thrive, and tomatoes here are typically started indoors about 6 weeks before last frost, averaging mid-May in Connecticut.
Always check your seed packet first — the packet for your variety wins over any general chart.
CropGermination soil temperature to aim forIf soil is too coldTomatoes65°F to 85°F; aim near 75°F to 80°FSlow, uneven sprouting; over 40 days at 50°FPeppers80°F to 90°F during germinationVery slow or no sprouting; among the slowest warm-season seedsEggplantAround 80°F to 85°FSlow germination, weak early growthCucumbers and squashGenerally 70°F to 85°FSlow sprouting; start later, as they dislike root disturbanceLettuce and cool-season greensRoughly 60°F to 70°FWarm soil can inhibit lettuce germination — skip the hot matBrassicas (cabbage, kale, broccoli)Roughly 65°F to 75°FGerminate in cooler soil; do not need pepper-level heatThe pattern is clear: peppers want the most heat, tomatoes want steady warmth, and cool-season crops want the mat off or turned down. A heat mat is a warm-season tool first.
[Image: Diagram of a seed tray cross-section on a heat mat, with arrows showing gentle bottom heat and a probe measuring soil temperature]
How a heat mat works — and what a thermostat changes
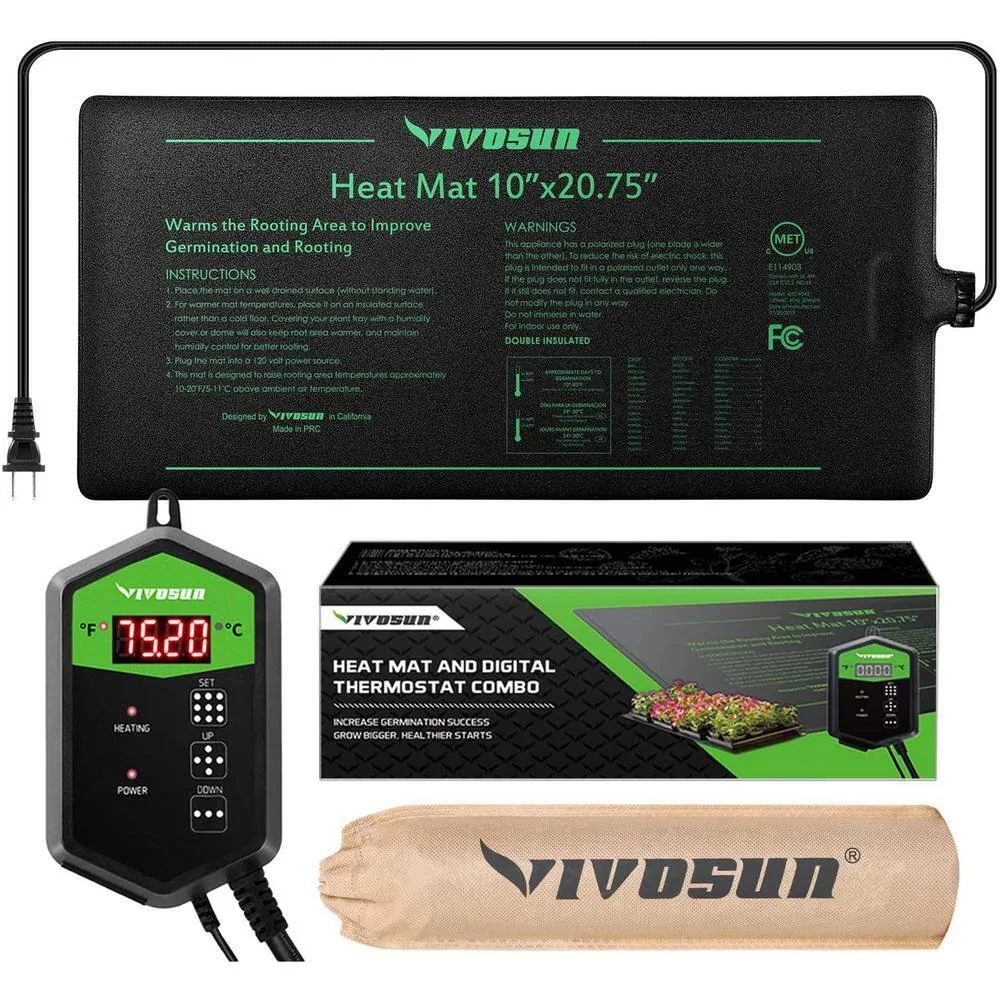
A basic heat mat is a thin, waterproof pad under a seed tray. It raises soil temperature roughly 10°F to 20°F above surrounding air temperature, per manufacturer guidance for the VIVOSUN mat. That range explains both its promise and its limit.
In a 65°F room, adding 10°F to 20°F brings tray soil into the mid-70s to mid-80s — right where tomatoes and peppers want to be. In a 45°F room, the same mat will struggle to reach a 75°F target, because it is lifting from a much lower starting point. The mat is not broken then. It is being asked to heat a cold room through a tray, which it was not designed to do.
A thermostat changes that. Without one, a mat runs at whatever temperature it reaches. With a thermostat and soil probe, you set a target, place the probe in the soil (not dangling in air), and the mat cycles on and off to hold it.
The featured mat here, the VIVOSUN Seedling Heat Mat and Thermostat, is a combo set: a 10-inch by 20.75-inch mat sized for a standard seed tray, plus a digital thermostat with a probe. Manufacturer documentation for this ASIN lists the mat at 20 watts, 120V, with an IP67-rated waterproof surface to wipe clean, not immerse. It warns against wrapping the mat in insulating materials, which can cause overheating, and notes indoor use only.
Step by step: using a heat mat the right way
1. Clean trays, sterile mix
Wash reused trays with soap and water, then rinse with diluted bleach — UConn Extension describes one part bleach to ten parts water — and let them dry. Cornell recommends a good-quality, prepared sterile mix, typically peat moss with perlite, lime, and a little fertilizer. Do not use garden soil: it drains poorly in small cells and can carry diseases that rot seeds.
2. Moisten, sow, label
Moisten mix evenly until it feels like a wrung-out sponge — damp through, not dripping. Fill cells, tap gently to settle, and sow at packet depth, commonly two to three times the seed's diameter. Label every tray with variety and sowing date. You will not remember which pepper is which in three weeks.
[Image: Clean seed trays, seed-starting mix, and labels laid out on a workbench before sowing]
3. Tray on the mat, probe in the soil
Set the mat on a flat, stable surface, not a freezing concrete floor if you can avoid it — a very cold surface underneath makes holding temperature harder. Put the tray directly on the mat. Insert the probe into soil in the middle of the tray, not in air above it or pressed against the mat. The probe must read what the seed feels.
Set targets by crop: tomatoes around 75°F to 80°F; peppers around 80°F to 85°F, up to 90°F if your packet or extension source supports it; eggplant around 80°F to 85°F; cool-season seeds with no mat, or a low setting after checking the packet. Group trays by need — one mat cannot hold two targets at once.
4. Cover lightly to hold moisture
A humidity dome keeps mix evenly moist during germination. Keep mix moist, not wet. Lift the cover to check moisture and let fresh air in. Heavy condensation plus a sour smell means too much water and too little air — water less and vent the dome.
A room monitor helps here. The TempPro TP50 temperature/humidity monitor (already in the Junecity Studio catalog) displays readings locally and sends no remote alerts. Air and soil temperatures are different numbers.
5. Check soil, not just the calendar
Tomatoes in their optimum range take roughly 6 to 8 days to emerge, per the UC chart below. Peppers take longer, often 10 days or more, even with heat. If nothing is up after the longest time on your packet, dig up one seed gently: firm and swollen may just be slow, while mushy has rotted. Check moisture daily and give warm-season seeds a fair window before declaring a tray dead.
6. To light, and turn the heat down
This step matters more than the mat itself. Once about half the seeds have sprouted, move the tray to strong light and remove it from the mat or turn heat down. After germination, Wisconsin Extension suggests soil around 70°F for tomatoes, peppers, and eggplants.
Light is now the limiting factor. Cornell notes even a sunny south-facing window often gives too little light, and recommends lights on 16 to 18 hours per day, close above plants. A dedicated seedling light, such as the SANSI 36W grow light (already in the Junecity Studio catalog), gives a consistent source once the dome comes off.
[Image: Seedlings under a grow light after germination, with the heat mat beside the tray to show the handoff from heat to light]
7. Water from below, then harden off
Let the surface dry slightly between waterings. Water from below when you can: set the tray in shallow water, let mix wick moisture up, then drain fully. This encourages roots to grow down and keeps the surface drier, reducing damping-off — the fungal problem that makes seedlings flop at the soil line.
Before transplanting, harden seedlings off over 7 to 10 days: sheltered shade first, then gradually more sun and wind. Wait until after last frost and until outdoor soil reaches at least 60°F for warm-season crops, per UConn.
Heat mat vs. no heat mat
SituationWith a mat and thermostatWithout a matWarm room (around 70°F), tomatoesNice to have; adds steadinessUsually fine if mix stays moistCool room (55°F to 65°F), tomatoes or peppersBig difference; lifts soil into rangeSlow, uneven; peppers may stall for weeksPeppers in a cool spring setupOften the difference between sprouting and sittingFrequently disappointing, especially hot peppersLettuce, spinach, cool-season greensUsually unnecessary; can hurt if too highPreferred; cool soil is what they wantUnheated greenhouse benchHelps only the tray on the matSame greenhouse problem, no warm traysAfter germinationRemove tray or turn heat downMove straight to strong lightTroubleshooting
Nothing sprouted. Check temperature, depth, then seed age. Is the probe in soil? Is the mat plugged into the thermostat, and the thermostat into a working outlet? Manufacturer troubleshooting lists those checks first, plus a warning that very cold air makes a high target hard to reach. If temperature was right, check whether mix stayed soggy — cold plus wet rots seeds.
Some cells sprouted, others did not. Usually uneven moisture, uneven depth, or part of the tray hanging off the mat. Keep the whole tray on the mat and water evenly.
Tall, pale, floppy seedlings. Almost never a heat-mat problem — it is a light problem, worsened by leaving heat on after germination. Move seedlings to strong light, lower it close above them, take the tray off the mat, and add gentle airflow.
White fuzz, or seedlings collapsing at the soil line. Points to damping-off and excess moisture. Use sterile mix, clean trays, and good drainage; let the surface dry slightly between waterings and remove affected seedlings promptly.
Mat feels hot, soil stays cool. Check what the mat sits on: cold concrete or metal loses heat downward. Put insulation or a board underneath — not wrapped around the mat, which guidance warns against — and confirm the probe is in moist soil, not air.
Thermostat reading jumps around. A probe in air or a dry pocket gives jumpy readings. Re-seat it in moist soil in the middle of the tray.
Where a heat mat fits in greenhouse growing
A heat mat fits for starting pepper and tomato trays on a bench in late winter and for steadying germination when a greenhouse cools sharply after sunset. It does not fit for heating greenhouse air overnight, protecting mature plants from frost, or warming a whole bench — it only warms what sits directly on it. For whole-greenhouse heat, see the videos linked below: greenhouse heat for the building, mat heat for the tray, light for the seedling.
[Image: Greenhouse bench in early spring with labeled trays, one on a heat mat and others off it, showing the mat's tray-sized footprint]
Frequently asked questions
Do seedling heat mats really work? Yes, for warm-season seeds in cool conditions. They raise soil into the germination range and help seeds sprout more evenly. They do not replace light, good mix, or viable seed, and they do not heat a greenhouse.
What temperature should I set? Tomatoes around 75°F to 80°F, peppers around 80°F to 85°F (up to 90°F during germination per Wisconsin Extension), cool-season crops with no mat or a low setting. Check your packet and verify with a probe in soil.
Do I leave the mat on after seeds sprout? No, not at germination temperature. Once about half the seeds have sprouted, move the tray to strong light and remove it from the mat or turn heat down. After germination, tomatoes, peppers, and eggplants do well around 70°F soil, per Wisconsin Extension.
Will a mat help lettuce or spinach? Usually no. Cool-season seeds germinate best in cooler soil, and warm soil can inhibit lettuce. Save the mat for warm-season seeds.
When should I start tomatoes and peppers in Connecticut? UConn notes tomatoes are typically started indoors about 6 weeks before last frost, averaging mid-May in Connecticut. Wisconsin Extension gives 4 to 6 weeks for tomatoes and 6 to 8 weeks for peppers before transplanting. Count back from your local last-frost estimate, and start peppers earlier than tomatoes.
Recommended tools and shopping list
- Featured: VIVOSUN Seedling Heat Mat and Thermostat — View on Amazon. The tray-sized mat and thermostat combo discussed throughout this article. It heats seed trays only — not a greenhouse — and the probe belongs in soil.
- TempPro TP50 temperature/humidity monitor — View on Amazon (already in the Junecity Studio catalog). Displays readings locally. It sends no remote alerts.
- SANSI 36W grow light — View on Amazon (already in the Junecity Studio catalog). For after germination, when strong, close light matters more than heat.
- Seed-starting trays (standard 1020 trays). A tray that fits the mat keeps every cell on the heat.
- Humidity domes for seed trays. Hold moisture during germination; vent as seedlings emerge, remove once they are up.
- Seed-starting mix (sterile, peat/perlite-based). Do not substitute garden soil; sterile mix drains well and reduces damping-off risk.
- Soil thermometer / probe thermometer. A second soil-temperature check, separate from the thermostat probe.
- Plant labels. Label variety and sowing date on every tray; peppers look identical until they fruit.
Prices and ratings change, so this draft states none. Check the current listing before buying, and buy the size that fits your trays.
[Image: Flat-lay shopping-list placeholder — heat mat, thermostat, tray, dome, seed-starting mix, labels, and a small thermometer on a bench]
The bottom line
Start with the seed that actually needs heat: peppers first, tomatoes second, cool-season crops not at all. Set the thermostat to the crop's range, put the probe in soil, keep mix moist but not soggy, and be patient. Then, as soon as seedlings are up, make the switch every beginner guide repeats: off the mat, under strong light, with airflow.
A heat mat will not save a bad setup, and it will not heat your greenhouse. For warming a seed tray in a cool room, it is one of the simplest upgrades in seed starting — and in a Connecticut spring, often the reason the peppers actually come up.
Keep exploring on Junecity Studio
For a winter or early-spring setup, read the companion indoor growing shelf guide:
- Indoor Growing Shelf for Winter: Beginner's Guide — draft cross-link; activate on publication. (Do not link /blog/indoor-growing-shelf-for-winter-beginners-guide live yet.)
For whole-greenhouse heat vs. tray heat, these Junecity Studio videos are directly relevant:
For more guides, projects, and tools, explore junecity.studio and the Junecity Studio shop.
Further reading / Sources
Only sources checked in this job are listed.
- Wisconsin Extension, Growing Tomatoes, Peppers and Eggplants in Wisconsin: https://barron.extension.wisc.edu/files/2023/02/Growing-Tomatoes-Peppers-and-Egg-Plants-in-Wisconsin.pdf
- UC Cooperative Extension, Sacramento County, Soil Temperature Conditions for Vegetable Seed Germination: https://ucanr.edu/sites/sacmg/files/164220.pdf
- Cornell CALS, Starting Plants Indoors: https://cals.cornell.edu/school-integrative-plant-science/school-sections/horticulture-section/outreach-and-extension/pandemic-vegetable-gardening/pandemic-vegetable-gardening-2021-archive/starting-plants-indoors
- University of New Hampshire Extension, How to Start Seeds Successfully Indoors: https://extension.unh.edu/blog/2021/03/how-start-seeds-successfully-indoors-audio
- UConn Home and Garden Education Center, Seed Starting, Simplified: https://homegarden.cahnr.uconn.edu/2026/03/07/seeds/
- UConn Extension, Vegetable Gardening: https://extension.uconn.edu/ask-uconn-extension/vegetable-gardening/
- VIVOSUN Heat Mat and Thermostat Combo manual, via Manuals.plus (ASIN B016MKY7C8): https://ht.manuals.plus/asin/B016MKY7C8
Affiliate disclosure: As an Amazon Associate, Junecity Studio may earn a commission from qualifying purchases made through links in this article, at no additional cost to you. That commission does not change what you pay, and it does not change the recommendations here: a seedling heat mat is recommended only for warming seed trays during germination, not for heating a greenhouse, and cool-season seeds generally do not need one.
Keep exploring
Find more Junecity guides
Browse practical gardening, outdoor living, and DIY articles.Browse the blogShop this guide
Affiliate Picks
Tools & supplies I use and recommend


As an affiliate, junecity.studio may earn from qualifying purchases at no additional cost to you.
Keep growing
Suggested reading
My Chicago Hardy Fig Is Still Producing! 😳
Discover how to successfully grow Chicago Hardy figs in colder climates, including tips on care, protection from frost, and maximizing your harvest.

My Backyard Tomato Factory Is Out of Control 🍅
Discover how to maximize your tomato harvest with effective trellising and care strategies. This guide covers everything from plant support to common mistakes, ensuring a bountiful yield.
0 comments
Comments (0)
We love hearing from our community. Share your thoughts, questions, or experience.
Have something to add?
Log in to post, react, share images, and join threads.
Newest First
All Comments
Showing 0-0 of 0
Start the conversation.
Questions and first-hand experience are welcome here.