
I Checked My Elderberry Cuttings… JACKPOT! 😳

Discover the joy of propagating European elderberry cuttings with our comprehensive guide. Learn the steps, tips, and common mistakes to ensure successful growth and a thriving elderberry plant.
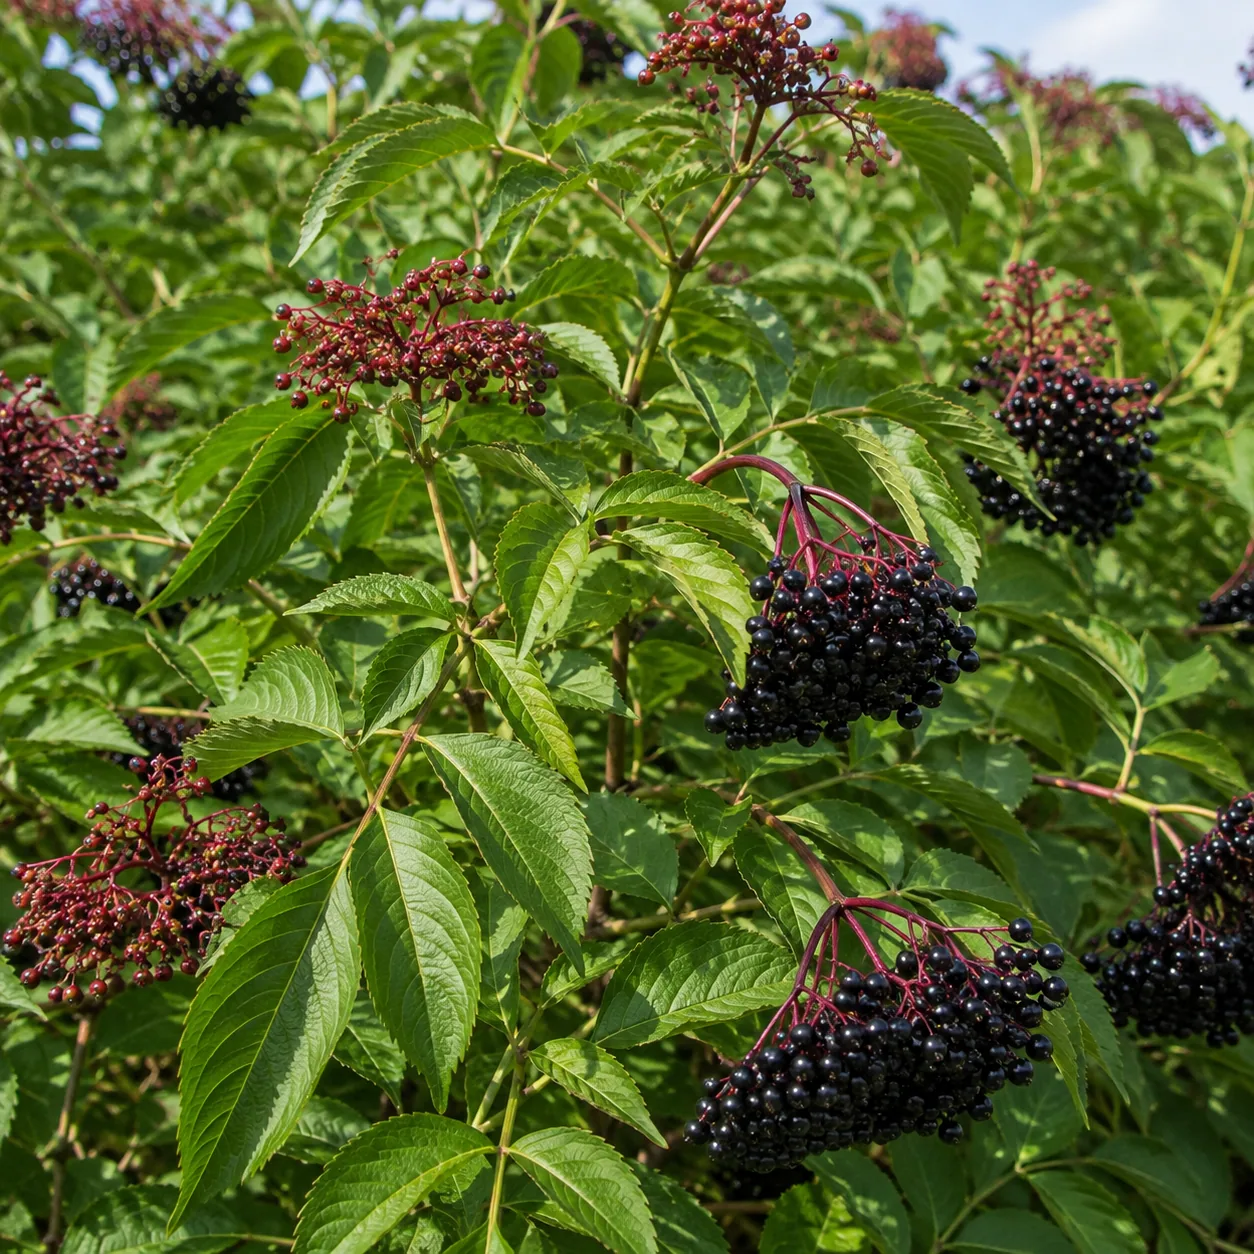
Are you excited about propagating your own elderberry plants? If you’ve ever considered growing European elderberries, you’re in for a rewarding gardening experience! In this article, we’ll explore the ins and outs of propagating elderberry cuttings, particularly focusing on the European elderberry (Sambucus nigra). From selecting the right cuttings to ensuring they thrive, we’ll guide you through each step of the process.
Why Propagate Elderberries?
European elderberries are not only beautiful, with their striking clusters of white flowers and dark purple berries, but they also offer numerous benefits:
- Health Benefits: Elderberries are rich in antioxidants and vitamins, making them a popular choice for syrups and remedies. They are known to support the immune system and can help combat colds and flu.
- Wildlife Friendly: The flowers attract pollinators, and the berries provide food for birds and other wildlife, enhancing biodiversity in your garden.
- Aesthetic Appeal: Their lush foliage and flowers add visual interest to gardens throughout the seasons, making them a beautiful addition to any landscape.
- Culinary Uses: Elderberries can be used to make jams, jellies, wines, and syrups, providing delicious and nutritious options for your kitchen.
Step-by-Step Guide to Propagating Elderberry Cuttings
1. Selecting the Right Cuttings
When choosing cuttings, look for healthy, vigorous stems from established plants. Ideally, choose cuttings that are about 6 inches long, with several nodes (the bumps along the stem where leaves grow). The best time to take cuttings is in late spring or early summer when the plant is actively growing. Selecting the right variety is also essential; European elderberries are preferred for their fruit production and overall vigor.
2. Preparing the Cuttings
Once you’ve selected your cuttings, remove the lower leaves, leaving only a couple at the top. This helps to reduce moisture loss while the cutting establishes roots. Ensure your tools are clean to prevent any diseases from affecting your cuttings.
3. Using Rooting Hormone
To promote faster rooting, dip the cut end of the cutting into a rooting hormone such as Clonex Rooting Gel. This high-performance gel contains IBA, which aids in root initiation and development. Applying the gel properly can make a significant difference in the success rate of your cuttings.
4. Planting the Cuttings
Fill a pot with a well-draining potting mix or a mix of perlite and peat. Insert the cuttings into the soil, ensuring at least one node is buried below the surface. Water the cuttings lightly and cover them with a plastic bag or a humidity dome to maintain moisture. This mini greenhouse effect will help create a humid environment that is conducive to rooting.
5. Care and Maintenance
Place the pot in a warm, bright location but out of direct sunlight. Keep the soil consistently moist but not soggy. Roots should develop within a few weeks. During this period, check for any signs of mold or rot, and ensure that air circulation is adequate. You can occasionally open the humidity dome to let in fresh air and prevent fungal issues.
6. Transplanting
Once the cuttings have established roots (usually after 4-6 weeks), you can transplant them into larger pots or directly into your garden. Choose a sunny location with well-draining soil. Before transplanting, harden off your cuttings by gradually exposing them to outdoor conditions over a week or two.
Common Mistakes to Avoid
- Skipping the Rooting Hormone: Using rooting hormone significantly increases the chances of successful rooting. Don’t overlook this essential step.
- Overwatering: Be careful not to drown your cuttings; maintain a balance between moist and soggy soil. Overly wet conditions can lead to root rot.
- Neglecting Light Conditions: Ensure your cuttings receive adequate light without being exposed to harsh, direct sun. Indirect light is ideal during the rooting process.
- Not Using Clean Tools: Always use sanitized tools when taking cuttings to prevent disease transmission.
Maintenance of Established Elderberry Plants
Once your elderberries are thriving in the garden, they require minimal maintenance. Regular watering, especially during dry spells, and occasional pruning will help promote healthy growth and fruit production. Fertilizing with a balanced fertilizer in early spring can also boost growth. Elderberries prefer slightly acidic soil, so testing your soil pH might be beneficial.
Pruning Elderberry Plants
Pruning is essential for maintaining the shape and health of your elderberry plants. In late winter or early spring, remove any dead or damaged branches and thin out crowded areas to encourage airflow. This practice helps reduce the risk of disease and promotes better fruit production.
Dealing with Pests and Diseases
Elderberries are relatively pest-resistant, but you may encounter aphids, spider mites, or fruit flies. Regularly inspect your plants for any signs of pests and treat them promptly using organic insecticidal soap or neem oil. Common diseases include powdery mildew and leaf spot; good air circulation and proper watering can help prevent these issues.
Harvesting Elderberries
Harvest elderberries when the fruits are fully ripe, typically in late summer to early fall. The berries should be dark purple and plump. Use scissors to cut the clusters, and be mindful of the small seeds within the berries, as they can be toxic if consumed raw. Cooking the berries helps neutralize any harmful compounds.
Conclusion
Propagating elderberry cuttings is a rewarding endeavor that can result in a bountiful harvest of berries and beautiful plants for your garden. By following these steps and avoiding common pitfalls, you’ll be well on your way to growing your own elderberries. Enjoy the process and the delicious rewards that come with it!
Photos from this idea

Helpful products for this project
These products were matched to the materials, tools, and care steps discussed in the article.
- Clonex Rooting Gel - High-Performance Rooting Compound for Plant Cuttings, Contains IBA, Promotes Root Initiation & Development - 100ml - View Product: HIGH-PERFORMANCE ROOTING GEL - Clonex Rooting Gel is a water-based formula with...
- Tri-Color Dappled Willow – 8" Rooted Cutting - Checkout: Tri-Color Dappled Willow (Salix integra ‘Hakuro Nishiki’) is a fast-growing...
- Syngonium ‘Three Kings’ – 2" Fully Rooted Cutting - Checkout: Syngonium ‘Three Kings’ is a beautiful variegated arrowhead plant known for its...
- 6" European Elderberry Cutting – Sambucus nigra - Checkout: Grow your own beautiful and productive European elderberry from a fresh 6-inch...
- Neem Bliss (16 Fl Oz) - Pure Neem Oil Concentrate - 100% Cold Pressed Neem Oil - All-Natural Neem Oil Concentrate - Pure Neem Oil Extract - Unrefined Neem Oil for Hair - Neem Seed Oil Concentrate - View Product: 100% Pure Neem Oil Extract - Plantonix Neem Bliss is pure, unrefined neem oil...
Source: Watch the original YouTube Short.
Keep exploring
Find more Junecity guides
Browse practical gardening, outdoor living, and DIY articles.Browse the blogKeep growing
Suggested reading
How to Grow Figs: From Planting to a Sweet Harvest
Learn how to successfully grow a healthy fig tree from planting to harvest, including watering, pruning, fertilizing, winter protection, and propagation.

A Jamaican Favorite Is Blooming in Connecticut! 🇯🇲
Discover how to grow the delicious naseberry tree in Connecticut, embracing a piece of Jamaican culture right in your backyard. Learn about the unique conditions, care tips, and the joy of witnessing this tropical fruit bloom in northern climates.
0 comments
Comments (0)
We love hearing from our community. Share your thoughts, questions, or experience.
Have something to add?
Log in to post, react, share images, and join threads.
Newest First
All Comments
Showing 0-0 of 0
Start the conversation.
Questions and first-hand experience are welcome here.