
This Cut Can Make or Break Your Graft 🌱🔪
Learn the critical importance of cut quality in grafting and discover the best techniques to ensure successful plant propagation.
At a glance
Key Takeaways
Use Sharp Tools
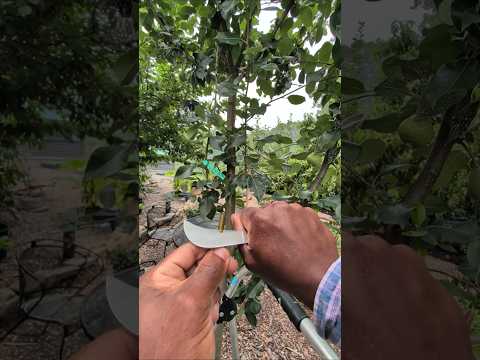
A sharp grafting knife ensures clean cuts, minimizing damage to plant tissues.

Align Cambium Layers
Proper alignment of cambium layers is critical for graft success.

Avoid Common Mistakes
Ensure cuts are clean and aligned to prevent graft failure.
Grafting is a fascinating and essential technique in the world of gardening and horticulture, allowing gardeners to propagate new plants by joining two different plant parts. The success of grafting heavily relies on the quality of the cut made during the process. A clean, precise cut is crucial for aligning the cambium layers of the scion and rootstock, ensuring successful nutrient and water transfer. In this article, we will explore the importance of the graft cut, essential tools for grafting, step-by-step techniques, common mistakes to avoid, and troubleshooting tips, along with some expert insights into the art of grafting.
Introduction to Grafting
Grafting involves joining a scion (the upper part of a plant) to a rootstock (the lower part) to create a new, hybrid plant. This method is widely used for fruit trees, ornamental plants, and various other species. The quality of the cut is a pivotal factor that influences the overall success of the graft. In grafting, the scion is chosen for its desirable traits, such as fruit quality or flower color, while the rootstock is selected for its hardiness and adaptability to soil conditions.
Importance of the Graft Cut
The graft cut must be executed with precision. A clean cut minimizes damage to plant tissues, promoting faster healing and successful union between the scion and rootstock. When the cambium layers of both parts align correctly, they can communicate effectively, allowing the plant to thrive. The cambium is a thin layer of growing tissue between the bark and wood, and proper contact between the cambium layers of the scion and rootstock is essential for the graft to take.
Key Factors for a Successful Graft Cut
- Sharp Tools: Always use a sharp grafting knife to ensure clean cuts. Dull tools can crush or tear plant tissues, leading to poor grafting outcomes.
- Proper Angle: The angle of the cut can affect how well the cambium layers align. A 45-degree angle is often recommended for optimal surface area contact.
- Cleanliness: Ensure that your tools are clean to prevent disease transmission. Wipe blades with rubbing alcohol before use.
Tools Required for Grafting
Having the right tools is essential for successful grafting. Here are some must-have tools:
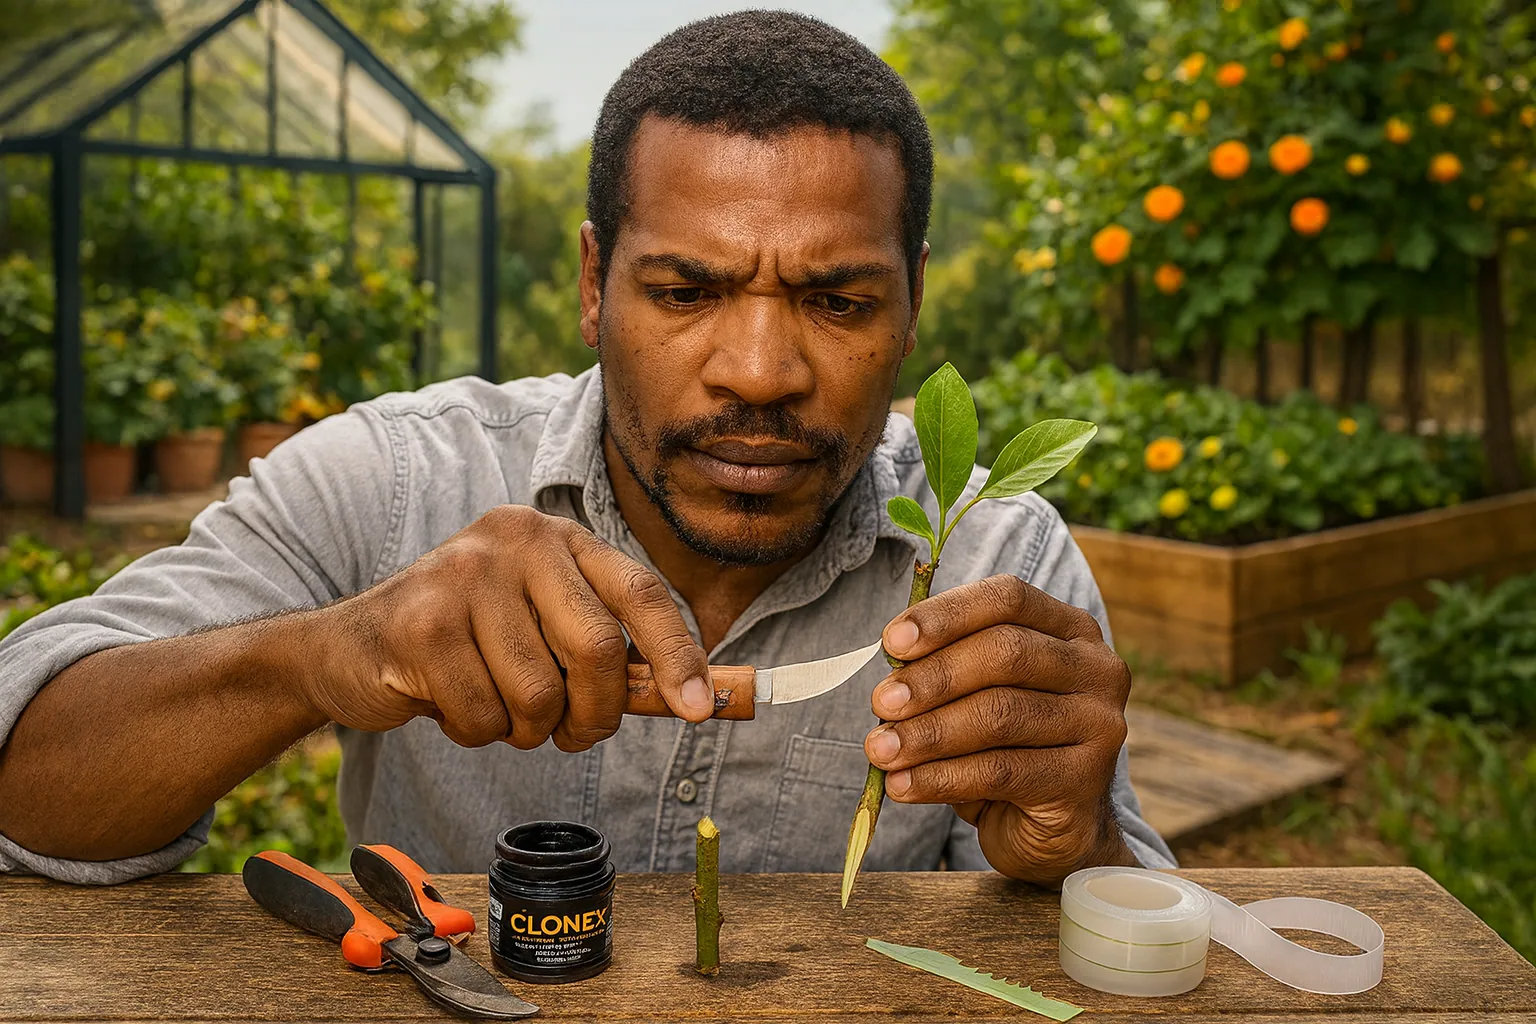
- Grafting Knife: A specialized knife designed for making precise cuts. Look for one with a comfortable grip and a sharp, thin blade.
- Grafting Tape: Used to secure the graft union and hold the scion and rootstock together. This tape should be elastic to allow for growth.
- Pruning Shears: Useful for trimming back the rootstock and scion to the desired size. Ensure they are sharp for clean cuts.
- Sealant (Optional): Some gardeners use a grafting sealant to protect the cut area from pests and diseases.
- Plant Labels: Helpful for identifying grafted plants and keeping track of varieties.
Step-by-Step Grafting Techniques
Here’s a step-by-step guide to performing a successful graft:
- Prepare the Scion: Cut the scion at a 45-degree angle, ensuring a clean and smooth surface. The scion should be about 6-8 inches long and have several buds.
- Prepare the Rootstock: Make a similar angled cut on the rootstock, creating a matching wedge. The rootstock should be of a compatible species and healthy.
- Align Cambium Layers: Place the scion onto the rootstock, ensuring that the cambium layers touch. This is crucial for successful grafting.
- Secure with Grafting Tape: Wrap the graft union tightly with grafting tape to hold it in place. This will help stabilize the graft as it heals.
- Monitor and Care: Keep the grafted plant in a humid environment and check for signs of growth. Mist the graft regularly to maintain moisture.
Common Mistakes and How to Avoid Them
Understanding common pitfalls in grafting can significantly increase your success rate:
- Using a Dull Knife: This can lead to jagged cuts that do not align properly, resulting in graft failure. Always ensure your tools are sharp.
- Improper Alignment: If cambium layers do not touch, the graft will not take. Double-check alignment before securing the graft.
- Neglecting Moisture: The grafted area needs to remain moist for successful healing. Use a plastic bag or mist the area to retain humidity.
- Forgetting to Label: Always label your grafts to keep track of varieties and their success rates. This will help in learning and improvement for future grafting.
Troubleshooting Grafting Issues
Sometimes, despite the best efforts, grafting may not succeed. Here are solutions to common problems:
- Graft Union Fails to Heal: This may be due to poor alignment. Make sure the cambium layers touch and secure the graft properly. If necessary, re-graft.
- Scion Wilts After Grafting: Insufficient moisture can cause stress. Mist the scion lightly and ensure a humid environment until it establishes.
- Graft Takes Too Long to Heal: If healing seems prolonged, check for pests or diseases that may be affecting the graft site.
- Growth of the Scion Stops: This could indicate a problem with nutrient transfer. Ensure that the graft is secure and that the rootstock is healthy.
Conclusion and Further Resources
Grafting can be a rewarding gardening technique when done correctly. By focusing on the quality of your cuts and following best practices, you can increase your chances of successful plant propagation. Whether you're looking to create a new apple variety or propagate your favorite flowering plants, mastering the art of grafting will enhance your gardening skills. For more resources, consider exploring grafting workshops or local gardening clubs, and don't hesitate to seek advice from experienced gardeners.
As you practice grafting, remember that patience and precision are key. Each grafting experience will teach you something new, so embrace the learning process and enjoy the journey of growing new plants!
Photos from this idea
Helpful products for this project
These products were matched to the materials, tools, and care steps discussed in the article.
- Clonex Rooting Gel - High-Performance Rooting Compound for Plant Cuttings, Contains IBA, Promotes Root Initiation & Development - 100ml - View Product: HIGH-PERFORMANCE ROOTING GEL - Clonex Rooting Gel is a water-based formula with...
- MEPEREZ Premium Pruning Shears For Gardening, Work 3 Times Easier, Pruners Heady Duty, Sharp Garden Clippers Cuting Florist Flower, Hedge, Herb, Rose, Indoor Live Plants, Arthritis Weak Hand Snips - View Product: 🎁STRONG CONSTRUCTION, DURABLE, SHARP FOR A LONG TIME: Made of premium materials...
- MEPEREZ Premium Germany - Steel Pruning Shears, Work 3 Times Easier, Pruners Heady Duty, Sharp Garden Clippers Cuting Florist Flower, Hedge, Herb, Rose, Indoor Live Plants, Arthritis Weak Hand Snips - View Product: 🎁WELL-MADE AND EASY TO USE: Our German-style garden clippers are a high quality...
- NAYE Grafting Gardening Knife,2-5/8" Curved Straight Blades Garden Knife for Budding Pruning,with Grafting Tape Plant Labels/Tree Tags - View Product: Razor sharp curved/straight two blade pocket grafting knife.
- Just Good Soil Essential Nutrient Protocol - 3-Step Soil Food System for Organic & Regenerative Gardening, Organic Plant Food & Soil Enhancer for Home Gardening - Sprout_01, Rise_02 & Replenish_03 - View Product: COMPLETE 3-STEP SOIL FOOD SYSTEM: Includes Sprout_01 Soil Life Kickstarter...
Source: Watch the original YouTube Short.
Keep growing
Suggested reading

My 5-Foot Squash Tree Is Still Loaded!
Discover the secrets to growing a thriving squash tree that keeps producing even as the garden slows down. Learn how to maximize growth and yield while troubleshooting common issues.
Find the Clues. Win the Lemon Tree. 🍋
Join the Junecity.studio Treasure Hunt and learn how to care for your very own Meyer lemon seedling. Discover tips, tricks, and the best practices to grow and nurture this delightful citrus tree!
0 comments
Comments (0)
We love hearing from our community. Share your thoughts, questions, or experience.
Have something to add?
Log in to post, react, share images, and join threads.
Newest First
All Comments
Showing 0-0 of 0
Start the conversation.
Questions and first-hand experience are welcome here.