
What Is a Hori Hori Knife? The Gardening Tool That Can Replace Several Others

A hori hori knife digs, plants, weeds, transplants, and divides perennials with one blade. Learn how to use it, sharpen it, and choose the right one.
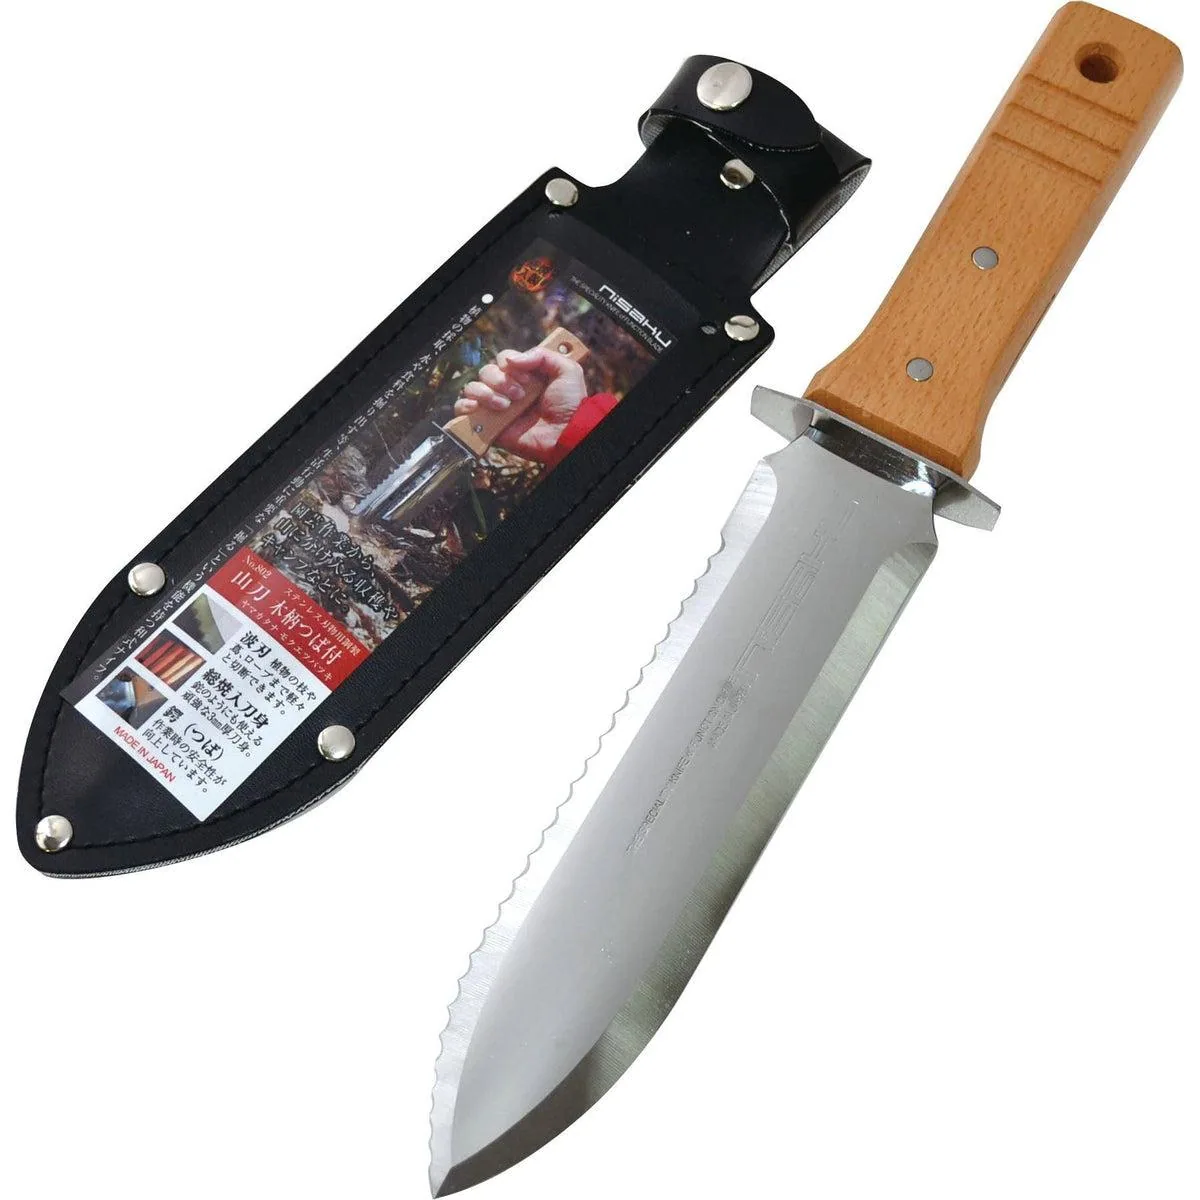
A hori hori knife is a Japanese garden knife built to do several everyday garden jobs with one blade: dig a hole, cut roots, pop out a weed, divide a perennial, and measure planting depth — without a trip back to the shed for a different tool each time.
The name comes from the Japanese word for to dig. University of Maine Cooperative Extension describes it as a traditional Japanese garden knife combining a sharp edge, a serrated edge, and a concave blade for troweling, sturdy enough to hoe and dig out weeds. Nebraska Extension calls it indispensable for digging, planting, weeding, dividing, and bulb planting. It does not replace every tool you own — just the small hand tools you keep reaching for, losing, and replacing.
[Image: Hori hori knife laid flat on a potting bench next to a seed tray, showing the straight edge, serrated edge, pointed tip, and inch markings on the blade]
How Does a Hori Hori Knife Compare to a Trowel?
A trowel scoops. A hori hori scoops, cuts, saws, and measures.
- One straight, sharpened edge for clean cuts through soil, stems, twine, and small roots.
- One serrated edge for sawing through tougher roots and fibrous material.
- A pointed tip for getting into tight soil and working around established plants.
- A slightly concave blade that holds soil like a small scoop.
- Inch markings on the blade so you can check planting depth without hunting for a ruler.
- A full, sturdy handle you can grip firmly, even with muddy or gloved hands.
Some models add a twine notch or a notched tip for dandelions. Nebraska Extension notes the trade-off: a notched tip can snag on roots and mulch, so many gardeners prefer a solid point. Most blades run 6 to 8 inches, per University of California Master Gardener guidance — long enough for real depth, short enough to control one-handed.
The featured pick: Nisaku Hori Hori Garden Knife
The featured pick is the Nisaku Hori Hori Garden Knife (NJP650): a 7.25-inch stainless steel blade with plain and serrated edges, a wood handle, inch markings, and a faux leather sheath. Care guidance for this model is hand wash only.
Stainless steel resists rust better than carbon steel when a tool gets left damp — and every gardener leaves a tool damp sooner or later. The sheath matters as much as the blade: return the knife to it every time you set it down, never loose in a bucket or on a bench. No price is listed here, as prices change; check the listing when you shop.
[Image: Close-up diagram of a hori hori blade labelling the straight edge, serrated edge, pointed tip, concave scoop, and depth markings]
Step-by-Step Guide: Using a Hori Hori Knife for Five Key Gardening Tasks
Push the blade into soil, rock it gently, and let the edges cut. Avoid twisting hard or prying sideways against rocks — that bends blades and loosens handles. Wear gloves, keep your free hand clear, and always cut away from your body.
1. Digging and planting
- Clear mulch with the back of the blade.
- Push the tip down, rock the handle to loosen a plug of soil.
- Scoop it out with the concave side.
- Repeat until the hole is wide and deep enough.
- Check depth with the inch markings.
- Set the plant in, firm the soil, and water in.
In Connecticut beds, where soil can turn rocky within a few feet, work in smaller bites. If the blade hits a rock, move over an inch and try again. For seed furrows, drag the tip to open a shallow trench, drop seed at packet spacing, and close it with the flat of the blade.
2. Transplanting seedlings and potted plants
A hori hori is gentler around roots than a big spade, making it a good tool for seedlings, divisions, and container plants.
- Water an hour before moving, so the root ball holds together.
- Cut a circle slightly wider than the root ball.
- Slide the blade underneath and lift the plant out with soil attached.
- Dig the new hole slightly wider, to the same depth as before.
- Set in, backfill, firm gently, and water well.
For a root-bound plant, score the root ball with the straight edge or cut circling roots at the bottom with the serrated edge — Nebraska Extension recommends the serrated side for this. A few clean cuts are enough.
3. Removing weeds, roots and all
Weeding with a hori hori works best when you go after the root, not just the top growth. Pulling the leaves off a dandelion leaves the root to regrow. Lifting the root out solves the problem for longer.
- Push the blade in a couple of inches from the stem, angled toward the root.
- Loosen soil on all sides.
- For taproots, slide down alongside the root and lever gently to lift it whole.
- For fibrous weeds, saw the root mass with the serrated edge, then lift the clump.
- Drop weeds in a bucket, not on the bed.
A stand-up weeder is faster in open lawn (see the companion piece on stand-up weed pullers, a draft cross-link to activate on publication — do not link /blog/grampas-weeder-stand-up-weed-puller-review live yet), but between perennials, along edging, and in containers, a hand knife reaches places a bigger tool cannot. Bag weeds that spread by root fragments rather than composting them.
4. Dividing perennials
Division revives overcrowded perennials that stop flowering well, develop a dead center, or outgrow their spot. University of Minnesota Extension's basic method: dig up the plant, remove loose soil, and separate it into divisions with three to five vigorous shoots and healthy roots. Keep divisions shaded and moist, and never divide in full bloom.
As a general rule, divide fall-blooming perennials in spring, and spring- and summer-blooming perennials in fall, leaving four to six weeks before the ground freezes. In Connecticut, fall division is a real window — but once the ground is cold and hard, wait for spring.
Here is the hori hori version:
- Water the day before if soil is dry.
- Dig a wide circle and lift the whole clump out.
- Shake off soil to see crown and roots.
- Tease apart sections by hand where they separate easily.
- Otherwise saw the crown with the serrated edge, using the blade base, not the tip.
- Trim dead roots with the straight edge.
- Replant at the original depth, firm, water well, and keep moist for several weeks.
Good candidates include daylilies, hostas, black-eyed Susans, and ornamental grasses. Peonies dislike disturbance, so check the specific plant first; when in doubt, divide a small outer section only.
[Image: Step-by-step diagram of dividing a perennial clump with a hori hori knife — lift the clump, saw through the crown, replant divisions at the same depth]
5. Planting bulbs
Bulb planting is where the depth markings stop being a nice extra and start being the point.
- Loosen soil slightly wider than the bulb.
- Push the blade to the package depth, checking the inch markings.
- Scoop out soil, drop the bulb pointy side up, and cover.
- Firm gently and water if dry.
Planting too shallow leaves bulbs exposed to temperature swings and animals; the markings remove that guesswork. For a large bulb bed, a spade is faster — but for a dozen bulbs between perennials, the hori hori is the right scale.
Hori hori vs. other hand tools
No single tool wins every job. This table is a realistic comparison, not a claim that one knife replaces a whole shed.
ToolBest forWhere a hori hori winsWhere the other tool winsHori hori knifeDigging, roots, tight-spot weeding, dividing, bulbsOne tool, several jobs—Garden trowelScooping soil and potting upCuts roots and weedsScooping loose mix quicklyStand-up weed pullerTaprooted weeds in open lawnWorks in beds and potsSpeed and back comfort; no kneelingHand weederSingle taprooted weedsStronger, deeper, more jobsPrecision in soft soilBypass prunersStems and branchesCutting roots in soilAny above-ground pruningThe takeaway is about trips, not tools: carrying a hori hori stops the walk back for the trowel, then the weeder, then the knife. For big jobs, bring the right big tool and let the hori hori handle the small work around it.
Choosing the right hori hori
You need a knife that fits your hand and your soil, not the most expensive one.
- Blade length: Around 7 inches suits most gardeners; shorter suits containers, longer reaches deeper but is harder to control.
- Blade material: Stainless steel resists rust. Carbon steel can hold an edge longer but rusts fast if left damp.
- Edges: One straight and one serrated edge is the classic setup. Check both feel sharp, not decorative.
- Handle and tang: Hold it before you buy if you can. A blade running through the handle (full tang) is stronger than one that stops partway in.
- Sheath and markings: A sturdy sheath with a belt clip is not optional, and inch markings match most U.S. seed packets and bulb packages.
Avoid a knife that feels flimsy. A twisting handle or flexing blade is a sign to step up, not a bargain.
Safety basics
Always sheath the knife when not using it — never carry it loose in a pocket. Cut away from your body, keep your free hand clear, and never cut wire, metal, stone, or hard plastic, which dulls and chips the edge. Use the base of the blade, not the tip, for heavier cuts, and never use it as a hammer or pry bar. Keep it from children, stored sheathed, indoors, and dry. If the handle loosens, the blade chips deeply, or the sheath fails, stop using it until repaired or replaced. In a crowded greenhouse, the sheath rule matters most: a blade left flat on a bench is easy to miss until someone grabs for a pot.
Blade maintenance: cleaning, sharpening, and storage
A clean, sharp hori hori is safer than a dull, dirty one: dull blades need more force, slip more, and tear plant tissue, giving disease an easier entry point. University of California tool-care guidance makes the same point.
After every use
- Wash off soil with soap and water.
- Dry completely — never air-dry in a damp shed.
- Wipe a thin coat of light oil over the blade.
- Sheath it and store indoors, dry.
Sharpening the straight edge
A combination whetstone or a small diamond file covers most hori hori sharpening.
- Clean the blade first.
- Work the straight edge at its existing bevel angle — do not create a new bevel.
- Push the stone or file in one direction, with light, even pressure.
- Flip and lightly remove the burr from the back.
- Test on twine: it should cut cleanly, not crush or tear.
Sharpen little and often; a few minutes after a heavy session beats a long rescue job at season's end.
Sharpening the serrated edge
Use a small round file or tapered rod that fits the serration, working each scallop at its existing angle. Do not grind the serrated side flat — that removes the teeth used for sawing roots.
Sanitizing between plants
If you are cutting diseased material, clean the blade between plants. University of Missouri Extension recommends removing soil first, then sanitizing — for example, dipping in one part household bleach to nine parts water for a couple of minutes and letting it evaporate. Rinse, dry, and oil lightly afterward, since bleach can encourage rust. Routine weeding of healthy plants does not need this step; suspected disease does.
Seasonal rule: sharpen and oil before the busy season and again before winter storage, then store sheathed, indoors, and dry.
Troubleshooting
- Blade will not cut cleanly: Clean off sap and soil, dry, then sharpen at the existing bevel.
- Serrated edge slides over roots: Switch to the serrated edge and sharpen each scallop with a round file; replace the knife if the teeth are gone.
- Rust spots: Scrub with steel wool, wash, dry fully, oil lightly, and store indoors from now on.
- Loose handle or bending blade: Stop prying sideways against rocks. Work in smaller bites, loosen hard ground with a fork first, and replace a knife whose handle will not stay tight.
- Weeds regrow: Dig deeper, lift the whole root, and bag weeds that spread by root fragments.
What a hori hori cannot replace
A hori hori will not dig a new bed, move a shrub, or edge a lawn efficiently — use a spade, fork, or shovel for that. It will not prune a shrub properly (bypass pruners make cleaner above-ground cuts), clear a large weedy area as fast as a hoe, or save your back in open lawn like a stand-up weeder. It covers the small jobs between the big tools; used as a spade substitute, it will frustrate you and wear out fast.
Recommended tools and shopping list
Start with the hori hori, then add companions. The featured knife is linked below; every other item still needs its link checked before publishing.
- Nisaku Hori Hori Garden Knife — Featured pick. A 7.25-inch stainless steel blade with straight and serrated edges, wood handle, inch markings, and a sheath.
- Heavy-duty transplant trowel — For fast scooping of loose potting mix.
- Leather-palm gardening gloves — Hand protection that still lets you grip the handle securely.
- Combination whetstone for garden blades — Coarse side for a dull edge, fine side for finishing.
- Compact sharpening file — Small round or tapered file for the serrated edge, scallop by scallop.
- Border digging fork — For lifting large clumps before dividing and loosening beds too big for the knife.
- Tool belt holster or bucket tool caddy — Keeps the sheathed knife, gloves, and twine on you, not lost on a bench.
- Wall-mounted garden tool rack — One dry, indoor home for the knife and its companions.
Frequently asked questions
Is a hori hori knife the same as a garden knife or soil knife?
Often, yes. Check the edges, blade length, depth markings, and sheath rather than trusting the name alone.
How do I sharpen a hori hori knife?
Clean and dry first. Sharpen the straight edge at its existing bevel, in one direction, then remove the back burr. Sharpen serrations scallop by scallop with a small round file, then oil lightly.
Will a hori hori knife rust?
Stainless resists rust but is not rust-proof. Wash, dry, oil lightly, and store indoors and dry, and rust stays small and fixable.
Can I use a hori hori knife in clay or rocky soil?
Yes, with care. Work in small bites, move around rocks, and do not twist hard sideways. Loosen very hard ground with a fork first.
Is a hori hori knife good for dividing perennials?
Yes — one of its best jobs. The serrated edge saws crowns and roots; follow the timing above, keep divisions moist, and replant at the original depth.
Keep learning on Junecity Studio
Start with one bed, one job, and the sheath habit.
For related decisions, read Bypass vs. Anvil Pruners for above-ground cutting, and Grampa's Weeder Stand-Up Weed Puller Review for open-lawn weeding without kneeling. Both are draft cross-links — activate on publication; do not treat as live until published.
Explore more at junecity.studio and the Junecity Studio shop — practical Connecticut greenhouse gardening.
Affiliate disclosure: Some links in this article are affiliate links, including the link to the Nisaku Hori Hori Garden Knife. If you buy through those links, Junecity Studio may earn a commission at no additional cost to you. That support helps keep the guides free. Recommendations here are based on the tool's features and published guidance, not on commission.
Further reading and sources
Only sources verified during research for this draft:
- University of Maine Cooperative Extension, March 2024: https://extension.umaine.edu/gardening/2024/03/01/maine-home-garden-news-march-2024/
- Nebraska Extension, Gardener Tools: https://lancaster.unl.edu/holiday-gifts-gardener-tools/
- UC Agriculture and Natural Resources, Hori Hori Garden Knife: https://ucanr.edu/blog/under-solano-sun/article/my-favorite-garden-tool-hori-hori-garden-knife
- University of Minnesota Extension, Dividing Perennials: https://extension.umn.edu/garden-and-home/yard-and-garden/gardening-in-minnesota/dividing-perennials
- University of Missouri Extension, Sanitizing Tools: https://extension.missouri.edu/news/practice-good-garden-hygiene-by-sanitizing-tools
- UF/IFAS Extension, Garden Tool Care: https://blogs.ifas.ufl.edu/hillsboroughco/2025/12/02/garden-tool-care-take-care-of-your-tools-and-theyll-take-care-of-you/
- Tomita Nisaku No. 802 specifications: https://daitool.com/products/tomita-nisaku-hori-hori-garden-knife-japanese-stainless-steel-digging-knife-no802
- Eartheasy, Classic Hori Hori care: https://eartheasy.com/products/classic-hori-hori-garden-tool
To verify before publishing (not linked — no published junecity.studio blog URL was confirmed for them): the winterize-greenhouse and houseplants-debug projects.
Keep exploring
Find more Junecity guides
Browse practical gardening, outdoor living, and DIY articles.Browse the blogShop this guide
Affiliate Picks
Tools & supplies I use and recommend

As an affiliate, junecity.studio may earn from qualifying purchases at no additional cost to you.
Keep growing
Suggested reading

Growing BANANAS in CONNECTICUT?! Winter Is Coming! 🍌🥶
Learn how to protect your banana trees in Connecticut's harsh winter. Discover effective insulation methods using grass clippings and other tips for successful banana cultivation in cold climates.

Winter Has No Chance Against My Radiant Heated Greenhouse! 🔥🥶
Discover how to prepare your greenhouse for winter with effective heating solutions to keep your plants thriving despite the cold. Explore practical tips, essential tools, and common mistakes to avoid.
0 comments
Comments (0)
We love hearing from our community. Share your thoughts, questions, or experience.
Have something to add?
Log in to post, react, share images, and join threads.
Newest First
All Comments
Showing 0-0 of 0
Start the conversation.
Questions and first-hand experience are welcome here.