
How to Install the Pot in a Pot for Easy Seasonal Changes

Learn how to create a practical pot-in-pot system that allows for easy seasonal plant swaps. This guide will help you bury a nursery pot as a permanent sleeve and effortlessly change out the inner pot as seasons change.
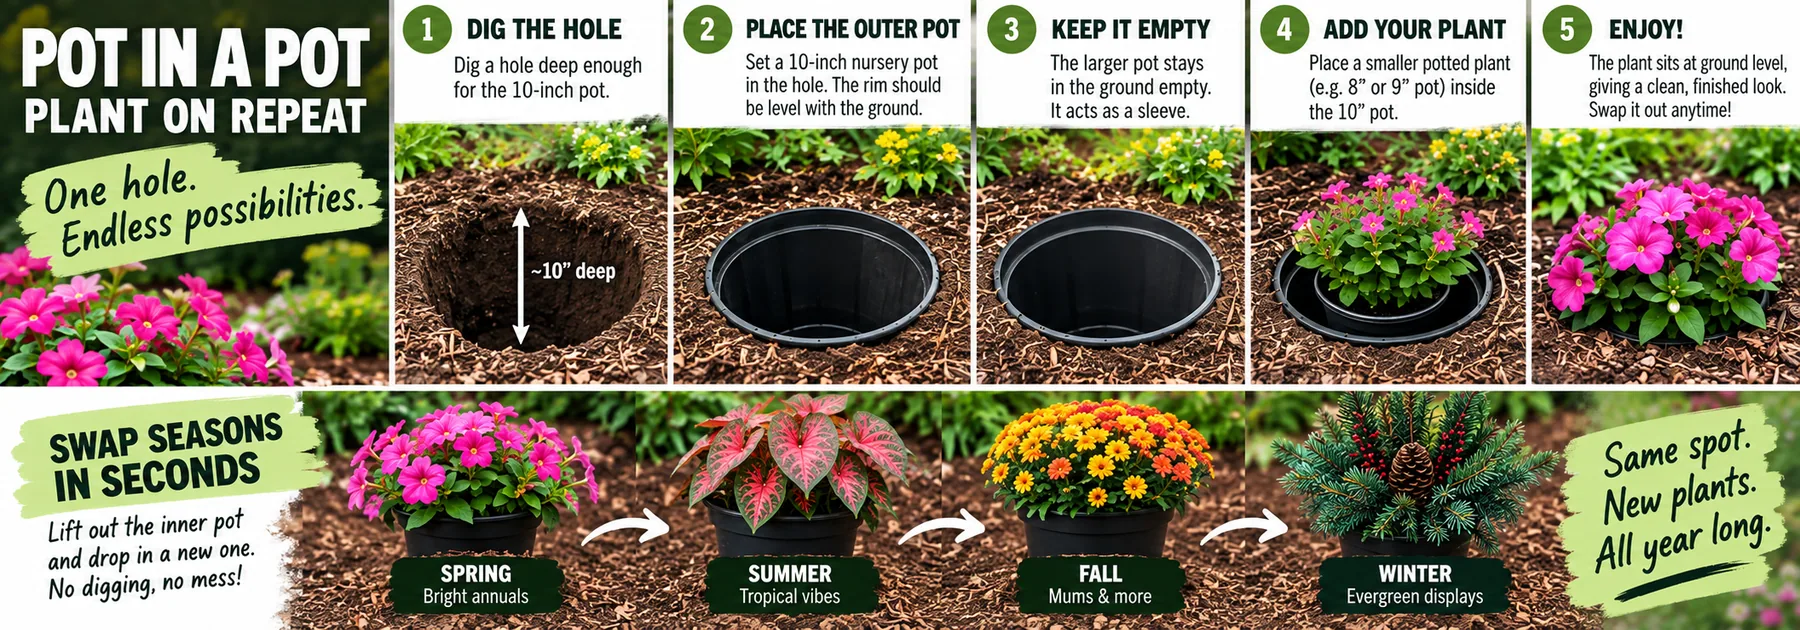
Creating a pot-in-pot system is an innovative way to make seasonal plant swaps easy and efficient. This method allows you to bury a 10-inch nursery pot in the ground as a permanent sleeve and place a slightly smaller planted pot inside it. When the season changes, simply lift out the inner pot and swap in the next one, keeping your garden looking fresh and vibrant.
Why Use a Pot-in-Pot System?
This system provides several benefits, including:
- Efficiency: Quickly change plants with minimal effort, ensuring your garden can adapt to seasonal changes seamlessly.
- Reusable Space: Maintain a clean spot for seasonal plants, allowing you to maximize your gardening space year-round.
- Protection: The outer pot provides insulation for the inner pot, protecting roots from extreme temperatures, frost, or excessive heat.
- Improved Drainage: By utilizing a nursery pot, you ensure that your plants have adequate drainage, preventing root rot and promoting healthier growth.
- Ease of Maintenance: With the ability to swap out plants, you can easily transition from summer blooms to winter greenery without disturbing the overall garden structure.
Materials Needed
Before you start, gather the following materials:
- 10-inch nursery pot: This will serve as the outer sleeve for your pot-in-pot system.
- 9-inch or smaller planted pot: Choose a pot that fits comfortably inside the nursery pot.
- Potting soil: A quality potting mix will provide the necessary nutrients for your plants.
- Mulch (optional): Mulch can help retain moisture and suppress weeds around the outer pot.
- Garden trowel: This will be used for digging and planting.
- Watering can: Ensure you have a way to water your newly planted pots.
Step-by-Step Instructions
Follow these steps to successfully install your pot-in-pot system:
- Choose the Location: Select a sunny spot in your garden where you want the pot to be buried. Ensure the area receives adequate sunlight according to the needs of your chosen plants.
- Prepare the Nursery Pot: Ensure the nursery pot has drainage holes. If it doesn't, you can create holes using a drill or a sharp object. Proper drainage is essential to prevent water from pooling and damaging your plants.
- Dig the Hole: Use your garden trowel to dig a hole deep enough to bury the nursery pot, ensuring it is level with the ground surface. The hole should be slightly wider than the pot to allow for easy insertion.
- Insert the Nursery Pot: Place the nursery pot into the hole and fill around it with soil, packing it down gently to eliminate air pockets. Make sure the top rim of the pot is even with the surrounding soil.
- Prepare the Inner Pot: Fill the smaller pot with potting soil, leaving about an inch of space at the top. Plant your seasonal plant of choice, ensuring it is well-centered and secure. Water the inner pot thoroughly to help the soil settle.
- Place the Inner Pot: Insert the smaller pot into the nursery pot. Make sure it sits comfortably and is easy to remove when it's time to swap out plants. This can be done by gently pressing down on the inner pot to ensure a snug fit.
- Add Mulch: If desired, add a layer of mulch on top of the soil around the nursery pot to help retain moisture and suppress weeds. This also gives a tidy appearance to your setup.
Maintenance Tips
During the growing season, ensure that both pots are adequately watered and that the inner pot is fertilized according to the needs of the seasonal plant. Here are some additional maintenance tips:
- Watering: Monitor the moisture levels in both pots. The outer nursery pot may retain moisture longer than the inner pot, so check for dryness in the inner pot.
- Fertilization: Feed the inner pot according to the specific requirements of the plant. A balanced, water-soluble fertilizer can be applied every few weeks during the growing season.
- Pest Control: Keep an eye out for pests. Inspect both pots regularly for signs of infestation, and treat any problems promptly with appropriate organic or chemical solutions.
- Seasonal Swaps: When it's time to change plants, gently lift the inner pot out of the nursery pot, replace it with a new planted pot, and ensure it is securely in place.
- Cleaning: Occasionally clean the outer nursery pot to prevent algae buildup and maintain a neat garden appearance.
Common Mistakes to Avoid
Here are some common pitfalls to avoid when setting up your pot-in-pot system:
- Choosing the Wrong Size Pots: Ensure the inner pot is smaller than the outer nursery pot for easy removal. If the inner pot is too large, it may become stuck.
- Overwatering: Be cautious with watering, as the outer pot can hold excess moisture. Always check the soil moisture levels before watering.
- Ignoring Drainage: Without proper drainage, your plants are at risk of root rot. Ensure that both pots allow for adequate drainage.
- Neglecting Sunlight Needs: Different plants have varying sunlight requirements. Ensure the location you choose provides the right amount of sunlight for your specific plants.
- Inconsistent Maintenance: Regularly check both pots for pests, diseases, and moisture levels to ensure healthy plant growth.
Conclusion
The pot-in-pot system is a simple and effective way to manage seasonal planting with ease. By following these steps, you can create a beautiful, changing display in your garden without the hassle of replanting every season. This method not only enhances the aesthetics of your garden but also promotes healthier plants by offering them the protection they need throughout the year.
Keep exploring
Find more Junecity guides
Browse practical gardening, outdoor living, and DIY articles.Browse the blogKeep growing
Suggested reading

I’ll Never Plant Flowers the Same Way Again 😳🌼
Discover innovative techniques to transform your flower planting experience with a pot-in-pot system that enhances aesthetics and simplifies maintenance.
Find the Clues. Win the Lemon Tree. 🍋
Join the Junecity.studio Treasure Hunt and learn how to care for your very own Meyer lemon seedling. Discover tips, tricks, and the best practices to grow and nurture this delightful citrus tree!
0 comments
Comments (0)
We love hearing from our community. Share your thoughts, questions, or experience.
Have something to add?
Log in to post, react, share images, and join threads.
Newest First
All Comments
Showing 0-0 of 0
Start the conversation.
Questions and first-hand experience are welcome here.